Difference between revisions of "VEYE MIPI 327 for Nano Pi 4 ubuntu"
| Line 30: | Line 30: | ||
|TX1<br /> | |TX1<br /> | ||
|} | |} | ||
| − | === | + | ===Using prebuilt Image to upgrade NanoPi4=== |
| − | * | + | *download |
| − | + | You can use the image prebuild by us to upgrade jetson nano system, which will support our camera. | |
| − | + | The image is based on friendlyelec-20190903 SD card version. Download [https://pan.baidu.com/s/1sWrcfEOivjuQ7T7P5bVcng#list/path=%2Fveye_mipi%E8%B5%84%E6%96%99%2Fnanopim4image here.] | |
| − | + | *Boot from SD Card | |
| − | + | Extract these files(rk3399-sd-friendlydesktop-bionic-4.4-arm64-20200112.img). Insert an SD card(at least 16G) into a Windows PC and run the win32diskimager utility as administrator. On the utility's main window select your SD card's drive, the wanted image file and click on "write" to start flashing the SD card. | |
| − | + | You can refer to [http://wiki.friendlyarm.com/wiki/index.php/NanoPi_M4#Boot_from_SD_Card Link]. | |
| − | === | + | ===Using source code to upgrade NanoPi4=== |
| − | + | This section provides instructions on how to update the system firmware using source code. It mainly involves two parts, kernel and dtb. Customers can refer to this section to port the driver of VEYE-MIPI-327 to the motherboard of other RK3399. | |
| − | ==== | + | ====Setting Up the Environment==== |
| − | * | + | *Install Cross Compiler |
| − | + | Please refer to [http://wiki.friendlyarm.com/wiki/index.php/NanoPi_M4#Boot_from_SD_Card link by friendlyarm] to install cross complier. | |
| − | * | + | *Download kernel source code |
| − | + | There are three way to get kernel source code. | |
| − | # | + | #linuxsdk-friendlyelec sdk provided by friendlyarm,Link:[http://download.friendlyarm.com/NanoPiM4 http://download.friendlyarm.com/N]<nowiki/>[http://download.friendlyarm.com/NanoPiM4 anoPiM4]。 |
| − | # | + | #from friendlyarm's github. |
| − | # | + | #from rockchip's github. |
| − | + | We use the first way,download linuxsdk-friendlyelec sdk,and sync it. | |
<code>tar -xvf linuxsdk-friendlyelec-20190903.tar</code> | <code>tar -xvf linuxsdk-friendlyelec-20190903.tar</code> | ||
| Line 65: | Line 65: | ||
<code>.repo/repo/repo sync -l</code> | <code>.repo/repo/repo sync -l</code> | ||
| − | * | + | *download bsp provided by us |
| + | |||
| + | The github link is :https://github.com/veyeimaging/rk3399_veye_dimaging_bsp | ||
| + | |||
| − | |||
<code>git clone [https://github.com/veyeimaging/rk3399_veye_dimaging_bsp https://github.com/veyeimaging/rk3399_veye_dimaging_bsp.git]</code> | <code>git clone [https://github.com/veyeimaging/rk3399_veye_dimaging_bsp https://github.com/veyeimaging/rk3399_veye_dimaging_bsp.git]</code> | ||
| − | ==== | + | ====Using prebuild Image and DTB==== |
| − | + | We provide NanoPi M4 resource.img and kernel.img. | |
| + | |||
| + | *Download sd-fuse_rk3399 | ||
| − | + | <code>git clone https://github.com/friendlyarm/sd-fuse_rk3399<nowiki/>.git</code> | |
| − | * | + | *Download friendlydesktop-arm64-images.tgz |
| − | + | Link:http://download.friendlyarm.com/NanoPiM4<nowiki/>,find the corresponding file in the images-for-eflasher directory and download it. | |
| − | |||
| − | |||
<code>tar -xzvf friendlydesktop-arm64-images.tgz -C sd-fuse_rk3399</code> | <code>tar -xzvf friendlydesktop-arm64-images.tgz -C sd-fuse_rk3399</code> | ||
| − | * | + | *Replace files and Flashing |
<code>tar -xzvf rk3399_veye_dimaging_bsp/ubuntu/platform/friendlyarm_nanopi4/images/kernel.img.tar.gz -C ./sd-fuse_rk3399/friendlydesktop-arm64/</code> | <code>tar -xzvf rk3399_veye_dimaging_bsp/ubuntu/platform/friendlyarm_nanopi4/images/kernel.img.tar.gz -C ./sd-fuse_rk3399/friendlydesktop-arm64/</code> | ||
| Line 93: | Line 95: | ||
<code>cp rk3399_veye_dimaging_bsp/ubuntu/platform/friendlyarm_nanopi4/images/update_partmap.txt ./sd-fuse_rk3399/friendlydesktop-arm64/</code> | <code>cp rk3399_veye_dimaging_bsp/ubuntu/platform/friendlyarm_nanopi4/images/update_partmap.txt ./sd-fuse_rk3399/friendlydesktop-arm64/</code> | ||
| − | + | Insert an SD card(at least 16G) into a Windows PC. Usingthe following command, you can only upgrade kernel and dtb, instead of flashing the whole card, will be faster. | |
<code>cd ./sd-fuse_rk3399/</code> | <code>cd ./sd-fuse_rk3399/</code> | ||
<code>sudo ./tools/sd_update -d /dev/sdb -p ./friendlydesktop-arm64/update_partmap.txt</code> | <code>sudo ./tools/sd_update -d /dev/sdb -p ./friendlydesktop-arm64/update_partmap.txt</code> | ||
| − | |||
| − | * | + | For more information on how to use sd-fuse_rk3399, please see sd-fuse_rk3399 Readme. |
| + | ====Building from Source code==== | ||
| + | |||
| + | *copyour driver files in the corresponding kernel directory | ||
<code>cp rk3399_veye_dimaging_bsp/ubuntu/drivers_source/VEYE-MIPI-327/veye327.c ~/linuxsdk-friendlyelec/kernel/drivers/media/i2c/</code> | <code>cp rk3399_veye_dimaging_bsp/ubuntu/drivers_source/VEYE-MIPI-327/veye327.c ~/linuxsdk-friendlyelec/kernel/drivers/media/i2c/</code> | ||
| Line 108: | Line 112: | ||
<code>cp rk3399_veye_dimaging_bsp/ubuntu/drivers_source/Kconfig ~/linuxsdk-friendlyelec/kernel/drivers/media/i2c/</code> | <code>cp rk3399_veye_dimaging_bsp/ubuntu/drivers_source/Kconfig ~/linuxsdk-friendlyelec/kernel/drivers/media/i2c/</code> | ||
| − | * | + | *Add compilation options |
cd <code>~/linuxsdk-friendlyelec/kernel</code> | cd <code>~/linuxsdk-friendlyelec/kernel</code> | ||
| Line 116: | Line 120: | ||
<code>make CROSS_COMPILE=aarch64-linux-gnu- ARCH=arm64 menuconfig</code> | <code>make CROSS_COMPILE=aarch64-linux-gnu- ARCH=arm64 menuconfig</code> | ||
| − | + | Add CONFIG_VIDEO_VEYE327 option | |
<code>make CROSS_COMPILE=aarch64-linux-gnu- ARCH=arm64 nanopi4-images</code> | <code>make CROSS_COMPILE=aarch64-linux-gnu- ARCH=arm64 nanopi4-images</code> | ||
<code>cp kernel.img resource.img ~/sd-fuse_rk3399/friendlydesktop-arm64/</code> | <code>cp kernel.img resource.img ~/sd-fuse_rk3399/friendlydesktop-arm64/</code> | ||
| − | ==== | + | =====Flashing SD card===== |
| − | + | Insert an SD card(at least 16G) into a Windows PC. Usingthe following command, you can only upgrade kernel and dtb. | |
<code>cd ./sd-fuse_rk3399/</code> | <code>cd ./sd-fuse_rk3399/</code> | ||
<code>sudo ./tools/sd_update -d /dev/sdb -p ./friendlydesktop-arm64/update_partmap.txt</code> | <code>sudo ./tools/sd_update -d /dev/sdb -p ./friendlydesktop-arm64/update_partmap.txt</code> | ||
| − | === | + | ===Applications and Test=== |
| − | ==== | + | ====Check system status==== |
| − | + | Run the following command to confirm whether the camera is initialized. | |
<code>dmesg | grep veye327</code> | <code>dmesg | grep veye327</code> | ||
| − | + | The output message appears as shown below: | |
<code>Detected VEYE06 sensor</code> | <code>Detected VEYE06 sensor</code> | ||
| − | ==== | + | ====Video Stream Toolkits Manual==== |
| − | ===== | + | =====Gstreamer Usage===== |
| − | ====== | + | ======using gst-camera-veye.sh====== |
| − | + | Since the gst-camera.sh officially provided by friendlyarm has a default resolution of 720p, which is not supported by VEYE-MIPI-327, we have provided a modified version —— gst-camera-veye.sh. | |
| − | + | In this directory: | |
<code>rk3399_veye_dimaging_bsp/ubuntu/platform/friendlyarm_nanopi4/gst-camera-sh/</code> | <code>rk3399_veye_dimaging_bsp/ubuntu/platform/friendlyarm_nanopi4/gst-camera-sh/</code> | ||
| − | * | + | *Preview FHD |
<code>./gst-camera-veye.sh -a preview</code> | <code>./gst-camera-veye.sh -a preview</code> | ||
| − | * | + | *Record FHD in H.264 format to a video file |
<code>./gst-camera-veye.sh --action video -output 1.ts</code> | <code>./gst-camera-veye.sh --action video -output 1.ts</code> | ||
| − | * | + | * Capturing FHD still image |
<code>./gst-camera-veye.sh -a photo -o 1.jpg</code> | <code>./gst-camera-veye.sh -a photo -o 1.jpg</code> | ||
| − | ====== | + | ======using gst-launch-1.0====== |
| − | * | + | *Preview FHD |
<code>gst-launch-1.0 rkisp device=/dev/video1 io-mode=4 ! video/x-raw,format=NV12,width=1920,height=1080,framerate=30/1 ! rkximagesink</code> | <code>gst-launch-1.0 rkisp device=/dev/video1 io-mode=4 ! video/x-raw,format=NV12,width=1920,height=1080,framerate=30/1 ! rkximagesink</code> | ||
| − | * | + | *Record FHD in H.264 format to a video file |
<code>gst-launch-1.0 rkisp num-buffers=512 device=/dev/video0 io-mode=1 ! video/x-raw,format=NV12,width=1920,height=1080,framerate=30/1 ! mpph264enc ! queue ! h264parse ! filesink location=/tmp/out.mp4 -e</code> | <code>gst-launch-1.0 rkisp num-buffers=512 device=/dev/video0 io-mode=1 ! video/x-raw,format=NV12,width=1920,height=1080,framerate=30/1 ! mpph264enc ! queue ! h264parse ! filesink location=/tmp/out.mp4 -e</code> | ||
| − | * | + | *Capturing FHD still image |
<code>gst-launch-1.0 rkisp num-buffers=2 device=/dev/video0 io-mode=1 ! video/x-raw,format=NV12,width=1920,height=1080,framerate=10/1 ! jpegenc ! multifilesink location="/tmp/isp-frame%d.jpg" -e</code> | <code>gst-launch-1.0 rkisp num-buffers=2 device=/dev/video0 io-mode=1 ! video/x-raw,format=NV12,width=1920,height=1080,framerate=10/1 ! jpegenc ! multifilesink location="/tmp/isp-frame%d.jpg" -e</code> | ||
| − | ==== | + | ====Video Control Toolkits Manual==== |
| − | + | We use DRA (Directly Register Access) mode to configure the camera module register. And a shell script is provided to help you use it. | |
<code>rk3399_veye_dimaging_bsp/ubuntu/i2c_cmd</code> | <code>rk3399_veye_dimaging_bsp/ubuntu/i2c_cmd</code> | ||
| − | * | + | *detect camera link status |
<code>i2cdetect [value]</code> | <code>i2cdetect [value]</code> | ||
| Line 186: | Line 190: | ||
|2 | |2 | ||
|MIPI-CSI2 | |MIPI-CSI2 | ||
| − | |} | + | |}Check whether the hardware connection is normal. The product i2C address of the VEYE327 camera module is 0x3b. |
| − | * | + | *After confirming that the hardware connection is working, the script command is as follows,-b indicates i2c bus: |
<code>veye_mipi_i2c_rk.sh</code> | <code>veye_mipi_i2c_rk.sh</code> | ||
| − | + | Video Control Toolkits Manual : [[VEYE-MIPI-290/327 i2c/|VEYE-MIPI-290/327 i2c]] | |
| − | === | + | ===Refernces=== |
| − | ==== | + | ====From Rockchip==== |
| − | |||
| − | |||
| − | |||
| − | |||
[http://opensource.rock-chips.com/wiki_Main_Page wiki] | [http://opensource.rock-chips.com/wiki_Main_Page wiki] | ||
| Line 204: | Line 204: | ||
[https://github.com/rockchip-linux/docs docs] | [https://github.com/rockchip-linux/docs docs] | ||
| + | ====From Friendlyarm ==== | ||
| + | [http://wiki.friendlyarm.com/wiki/index.php/NanoPi_M4/zh wiki] | ||
| − | + | [https://github.com/friendlyarm github] | |
| − | |||
| − | |||
| − | |||
| − | |||
| − | |||
| − | |||
| − | |||
| − | |||
| − | |||
| − | + | [http://download.friendlyarm.com/NanoPiM4 Download Center] | |
Revision as of 09:02, 14 January 2020
How to use VEYE-MIPI-327 camera module on FriendlyARM NanoPi 4(RK3399)
1 Overview
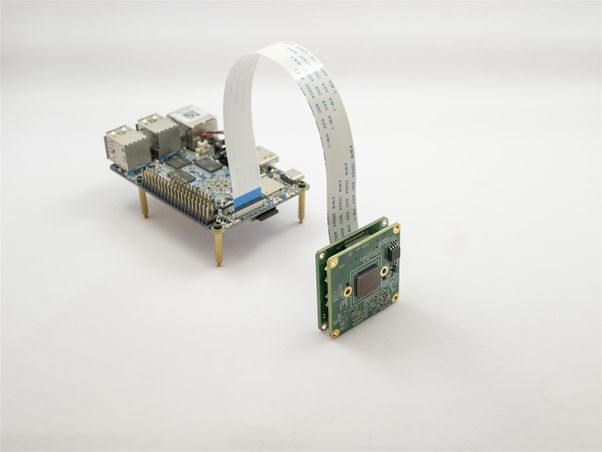
This guide shows how to use VEYE-MIPI-290/327 on Friendlyarm Nanopi4(NanoPi M4,NanoPi NEO4,NanoPi T4),we use NanoPi M4 as an example.
RK3399 is Rockchip opensource platform. We use linuxsdk-friendlyelec-20190903 version SDK,and micro SD card version.
2 Hardware Setup
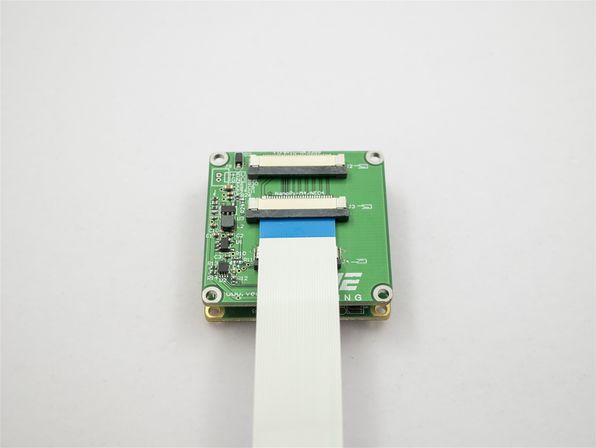
The system installation is shown as follows in the figure. We have Nanopi adapter board:VEYE-MIPI-327RK datasheet.
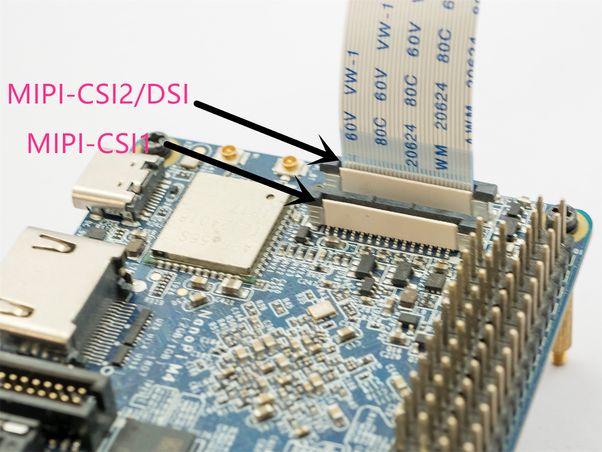
Note:NanoPi M4 board MIPI-CSI2 interface description
| Interface | I2C | DPHY | facing | Reuse |
|---|---|---|---|---|
| MIPI-CSI1 | 1 | RX0 | back | NA |
| MIPI-CSI2 | 2 | RX1 | front | TX1 |
3 Using prebuilt Image to upgrade NanoPi4
- download
You can use the image prebuild by us to upgrade jetson nano system, which will support our camera.
The image is based on friendlyelec-20190903 SD card version. Download here.
- Boot from SD Card
Extract these files(rk3399-sd-friendlydesktop-bionic-4.4-arm64-20200112.img). Insert an SD card(at least 16G) into a Windows PC and run the win32diskimager utility as administrator. On the utility's main window select your SD card's drive, the wanted image file and click on "write" to start flashing the SD card.
You can refer to Link.
4 Using source code to upgrade NanoPi4
This section provides instructions on how to update the system firmware using source code. It mainly involves two parts, kernel and dtb. Customers can refer to this section to port the driver of VEYE-MIPI-327 to the motherboard of other RK3399.
4.1 Setting Up the Environment
- Install Cross Compiler
Please refer to link by friendlyarm to install cross complier.
- Download kernel source code
There are three way to get kernel source code.
- linuxsdk-friendlyelec sdk provided by friendlyarm,Link:http://download.friendlyarm.com/NanoPiM4。
- from friendlyarm's github.
- from rockchip's github.
We use the first way,download linuxsdk-friendlyelec sdk,and sync it.
tar -xvf linuxsdk-friendlyelec-20190903.tar
.repo/repo/repo sync -l
- download bsp provided by us
The github link is :https://github.com/veyeimaging/rk3399_veye_dimaging_bsp
git clone https://github.com/veyeimaging/rk3399_veye_dimaging_bsp.git
4.2 Using prebuild Image and DTB
We provide NanoPi M4 resource.img and kernel.img.
- Download sd-fuse_rk3399
git clone https://github.com/friendlyarm/sd-fuse_rk3399.git
- Download friendlydesktop-arm64-images.tgz
Link:http://download.friendlyarm.com/NanoPiM4,find the corresponding file in the images-for-eflasher directory and download it.
tar -xzvf friendlydesktop-arm64-images.tgz -C sd-fuse_rk3399
- Replace files and Flashing
tar -xzvf rk3399_veye_dimaging_bsp/ubuntu/platform/friendlyarm_nanopi4/images/kernel.img.tar.gz -C ./sd-fuse_rk3399/friendlydesktop-arm64/
tar -xzvf rk3399_veye_dimaging_bsp/ubuntu/platform/friendlyarm_nanopi4/images/resource.img.tar.gz -C ./sd-fuse_rk3399/friendlydesktop-arm64/
cp rk3399_veye_dimaging_bsp/ubuntu/platform/friendlyarm_nanopi4/images/update_partmap.txt ./sd-fuse_rk3399/friendlydesktop-arm64/
Insert an SD card(at least 16G) into a Windows PC. Usingthe following command, you can only upgrade kernel and dtb, instead of flashing the whole card, will be faster.
cd ./sd-fuse_rk3399/
sudo ./tools/sd_update -d /dev/sdb -p ./friendlydesktop-arm64/update_partmap.txt
For more information on how to use sd-fuse_rk3399, please see sd-fuse_rk3399 Readme.
4.3 Building from Source code
- copyour driver files in the corresponding kernel directory
cp rk3399_veye_dimaging_bsp/ubuntu/drivers_source/VEYE-MIPI-327/veye327.c ~/linuxsdk-friendlyelec/kernel/drivers/media/i2c/
cp rk3399_veye_dimaging_bsp/ubuntu/drivers_source/Makefile ~/linuxsdk-friendlyelec/kernel/drivers/media/i2c/
cp rk3399_veye_dimaging_bsp/ubuntu/drivers_source/Kconfig ~/linuxsdk-friendlyelec/kernel/drivers/media/i2c/
- Add compilation options
cd ~/linuxsdk-friendlyelec/kernel
make CROSS_COMPILE=aarch64-linux-gnu- ARCH=arm64 nanopi4_linux_defconfig
make CROSS_COMPILE=aarch64-linux-gnu- ARCH=arm64 menuconfig
Add CONFIG_VIDEO_VEYE327 option
make CROSS_COMPILE=aarch64-linux-gnu- ARCH=arm64 nanopi4-images
cp kernel.img resource.img ~/sd-fuse_rk3399/friendlydesktop-arm64/
4.3.1 Flashing SD card
Insert an SD card(at least 16G) into a Windows PC. Usingthe following command, you can only upgrade kernel and dtb.
cd ./sd-fuse_rk3399/
sudo ./tools/sd_update -d /dev/sdb -p ./friendlydesktop-arm64/update_partmap.txt
5 Applications and Test
5.1 Check system status
Run the following command to confirm whether the camera is initialized.
dmesg | grep veye327
The output message appears as shown below:
Detected VEYE06 sensor
5.2 Video Stream Toolkits Manual
5.2.1 Gstreamer Usage
5.2.1.1 using gst-camera-veye.sh
Since the gst-camera.sh officially provided by friendlyarm has a default resolution of 720p, which is not supported by VEYE-MIPI-327, we have provided a modified version —— gst-camera-veye.sh.
In this directory:
rk3399_veye_dimaging_bsp/ubuntu/platform/friendlyarm_nanopi4/gst-camera-sh/
- Preview FHD
./gst-camera-veye.sh -a preview
- Record FHD in H.264 format to a video file
./gst-camera-veye.sh --action video -output 1.ts
- Capturing FHD still image
./gst-camera-veye.sh -a photo -o 1.jpg
5.2.1.2 using gst-launch-1.0
- Preview FHD
gst-launch-1.0 rkisp device=/dev/video1 io-mode=4 ! video/x-raw,format=NV12,width=1920,height=1080,framerate=30/1 ! rkximagesink
- Record FHD in H.264 format to a video file
gst-launch-1.0 rkisp num-buffers=512 device=/dev/video0 io-mode=1 ! video/x-raw,format=NV12,width=1920,height=1080,framerate=30/1 ! mpph264enc ! queue ! h264parse ! filesink location=/tmp/out.mp4 -e
- Capturing FHD still image
gst-launch-1.0 rkisp num-buffers=2 device=/dev/video0 io-mode=1 ! video/x-raw,format=NV12,width=1920,height=1080,framerate=10/1 ! jpegenc ! multifilesink location="/tmp/isp-frame%d.jpg" -e
5.3 Video Control Toolkits Manual
We use DRA (Directly Register Access) mode to configure the camera module register. And a shell script is provided to help you use it.
rk3399_veye_dimaging_bsp/ubuntu/i2c_cmd
- detect camera link status
i2cdetect [value]
| value | description |
|---|---|
| 1 | MIPI-CSI1 |
| 2 | MIPI-CSI2 |
Check whether the hardware connection is normal. The product i2C address of the VEYE327 camera module is 0x3b.
- After confirming that the hardware connection is working, the script command is as follows,-b indicates i2c bus:
veye_mipi_i2c_rk.sh
Video Control Toolkits Manual : VEYE-MIPI-290/327 i2c


