Difference between revisions of "Mv series camera appnotes 4 rpi"
| Line 45: | Line 45: | ||
(TODO picture) | (TODO picture) | ||
| + | |||
| + | === piOS Configuration === | ||
| + | For details on how to install the Raspberry Pi system, please refer to the official documentation at [https://www.raspberrypi.org/documentation/installation/ Install raspberry pi guide]. | ||
| + | |||
| + | Initially, the Raspberry Pi system I2C is not enabled. After booting, we need to turn them on manually by executing the following command: | ||
| + | |||
| + | <code>sudo raspi-config</code>[[File:Raspi-config bullseye.png|alt=|center|thumb|608x608px|raspi-config bullseye|link=http://wiki.veye.cc/index.php/File:Raspi-config_bullseye.png]]Enter Interface Options, enable I2C, and then restart the Raspberry Pi. | ||
| + | |||
| + | It is recommended to enable the ssh service and samba service of Raspberry Pi system, here we will not go into the details of how to enable ssh and samba service of Raspberry Pi system. | ||
| + | |||
| + | === Legacy mode and V4L2 mode introduction === | ||
| + | The difference between these two modes is described in detail on the [https://www.raspberrypi.com/documentation/accessories/camera.html#libcamera-and-the-legacy-raspicam-camera-stack Raspberry Pi website.] The libcamera-stack mode mentioned on the Raspberry Pi website is architecturally identical to the V4L2 mode we are talking about. | ||
| + | |||
| + | ==== Legacy mode ==== | ||
| + | Traditional mode, relying on Broadcom's GPU for image processing. The traditional raspicam software set uses this model. | ||
| + | |||
| + | The disadvantage of this model is closed. The GPU side is closed source, can not freely access sensor. | ||
| + | |||
| + | The Raspberry Pi organization has switched to the libcamera camera stack, but this model still has value: | ||
| + | |||
| + | # More use of GPU resources and lower CPU load. This is useful for earlier versions of the Raspberry Pi where CPU performance is poorer. | ||
| + | # It is possible to simply and directly fetch image data to the application layer without the support of the driver layer. This is especially useful for cameras that do not rely on the Raspberry Pi's isp. | ||
| + | # libcamera lacks some feature support now. | ||
| + | |||
<br /> | <br /> | ||
Revision as of 15:18, 14 April 2022
1 Introduction
The MV series cameras are cameras introduced for AI applications in the industrial field. It uses the MIPI CSI-2 interface, which is especially suitable for embedded computing platforms.
It features rich data formats and trigger characteristics, extremely low latency, extremely high bandwidth and reliable stability.
This article describes how to use the MV series camera on the Raspberry Pi platform.
1.1 Camera module list
| Series | Model | Status |
|---|---|---|
| MV series | MV-MIPI-IMX178M | Done |
2 Hardware Setup
MV series cameras need to use ADP-MV1 adapter board in order to connect to Raspberry Pi.
We take MV-MIPI-IMX178M as an example to introduce the hardware installation method.
2.1 Connection of MV-MIPI-IMX178M and ADP-MV1
The two are connected using 0.5 mm pitch*30P FFC cable with opposite direction. The cable must be inserted with the silver contacts facing outside.
(TODO picture)
2.2 Connection of ADP-MV1 to Raspberry Pi
2.2.1 Power supply
The ADP-MV1 requires a separate 5V power supply and can be powered directly from the Raspberry Pi motherboard using a Dupont cable.
(TODO picture)
2.2.2 Raspberry Pi Model B and B+
The two are connected using 1.0 mm pitch*15P FFC cable with opposite direction. Pay attention to the silver contacts facing side.
(TODO picture)
2.2.3 Raspberry Pi Zero, Zero W and Computer Module
The two are connected using 15Pto22P FFC cable with same direction. Pay attention to the silver contacts facing side.
(TODO picture)
3 piOS Configuration
For details on how to install the Raspberry Pi system, please refer to the official documentation at Install raspberry pi guide.
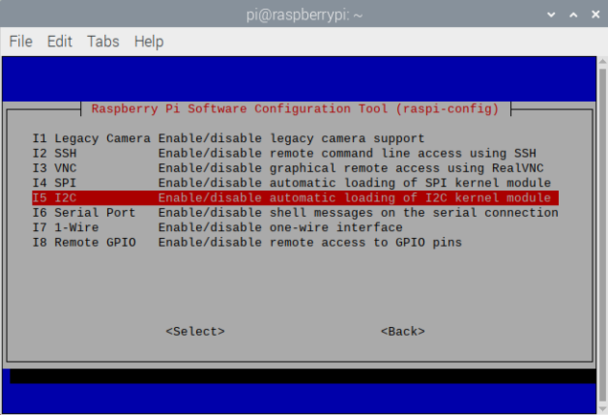
Initially, the Raspberry Pi system I2C is not enabled. After booting, we need to turn them on manually by executing the following command:
sudo raspi-config
Enter Interface Options, enable I2C, and then restart the Raspberry Pi.
It is recommended to enable the ssh service and samba service of Raspberry Pi system, here we will not go into the details of how to enable ssh and samba service of Raspberry Pi system.
4 Legacy mode and V4L2 mode introduction
The difference between these two modes is described in detail on the Raspberry Pi website. The libcamera-stack mode mentioned on the Raspberry Pi website is architecturally identical to the V4L2 mode we are talking about.
4.1 Legacy mode
Traditional mode, relying on Broadcom's GPU for image processing. The traditional raspicam software set uses this model.
The disadvantage of this model is closed. The GPU side is closed source, can not freely access sensor.
The Raspberry Pi organization has switched to the libcamera camera stack, but this model still has value:
- More use of GPU resources and lower CPU load. This is useful for earlier versions of the Raspberry Pi where CPU performance is poorer.
- It is possible to simply and directly fetch image data to the application layer without the support of the driver layer. This is especially useful for cameras that do not rely on the Raspberry Pi's isp.
- libcamera lacks some feature support now.
