Difference between revisions of "CS-MIPI-X for Raspberry Pi"
| Line 7: | Line 7: | ||
Theoretically,VEYE Camera Modules support all Raspberry Pi. For performance reasons, I recommend you use 3,3+,4 version. This article uses Raspberry Pi 4 as an example to explain how the CS-MIPI-X camera module working with Raspberry Pi. It also explain the specials of RPI Computer Module and Zero using VEYE Camera Module. | Theoretically,VEYE Camera Modules support all Raspberry Pi. For performance reasons, I recommend you use 3,3+,4 version. This article uses Raspberry Pi 4 as an example to explain how the CS-MIPI-X camera module working with Raspberry Pi. It also explain the specials of RPI Computer Module and Zero using VEYE Camera Module. | ||
| − | + | === About piOS---Bullseye === | |
| + | The latest system of Raspberry Pi - bullseye has removed the support of raspicam by default. But we still have 2 ways to use it. | ||
| + | |||
| + | * 1, Use the legacy version of the OS, that is, do not upgrade to Bullseye. | ||
https://www.raspberrypi.com/software/operating-systems/ | https://www.raspberrypi.com/software/operating-systems/ | ||
| − | Use this cmd to check your system version: | + | * 2, Open legacy camera support in raspi-config on Bullseye. We have upgraded the program to accommodate this usage. |
| + | |||
| + | <blockquote><u>If you want to add the legacy camera interfaces to Bullseye, please click your update icon in the taskbar to update. Then open a terminal (Ctrl-Alt-T) and type ‘sudo raspi-config’, go to ‘Interface Options’ and then ‘Legacy Camera’, and reboot. These camera interfaces are deprecated, and we are not supporting them going forwards.</u></blockquote>https://www.raspberrypi.com/news/new-old-functionality-with-raspberry-pi-os-legacy/ | ||
| + | |||
| + | By the way, Use this cmd to check your system version: | ||
<code>lsb_release -a</code> | <code>lsb_release -a</code> | ||
Revision as of 17:29, 9 December 2021
How to Use CS-MIPI-X Mipi Camera with Raspberry Pi
1 Introduction
CS-MIPI-X is a is a series of mipi camera module which is compatible with RASPBERRY PI. The output format is stanard UYVY stream. It is very easy to use it with RASPBERRY PI.Of course, she also has some subtle differences with the official version,i2c cmd is different.
Theoretically,VEYE Camera Modules support all Raspberry Pi. For performance reasons, I recommend you use 3,3+,4 version. This article uses Raspberry Pi 4 as an example to explain how the CS-MIPI-X camera module working with Raspberry Pi. It also explain the specials of RPI Computer Module and Zero using VEYE Camera Module.
2 About piOS---Bullseye
The latest system of Raspberry Pi - bullseye has removed the support of raspicam by default. But we still have 2 ways to use it.
- 1, Use the legacy version of the OS, that is, do not upgrade to Bullseye.
https://www.raspberrypi.com/software/operating-systems/
- 2, Open legacy camera support in raspi-config on Bullseye. We have upgraded the program to accommodate this usage.
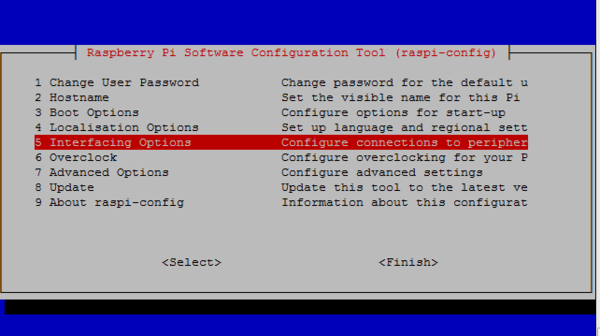
If you want to add the legacy camera interfaces to Bullseye, please click your update icon in the taskbar to update. Then open a terminal (Ctrl-Alt-T) and type ‘sudo raspi-config’, go to ‘Interface Options’ and then ‘Legacy Camera’, and reboot. These camera interfaces are deprecated, and we are not supporting them going forwards.
https://www.raspberrypi.com/news/new-old-functionality-with-raspberry-pi-os-legacy/
By the way, Use this cmd to check your system version:
lsb_release -a
3 Hardware Setup
Essentials You Need:
- Raspberry PI Items : RPI, Network, MicroSD Card, Power, Monitor
- Camera Module Items : CS-MIPI-X,FFC,Dupont Wire,Lens.
Setup guide
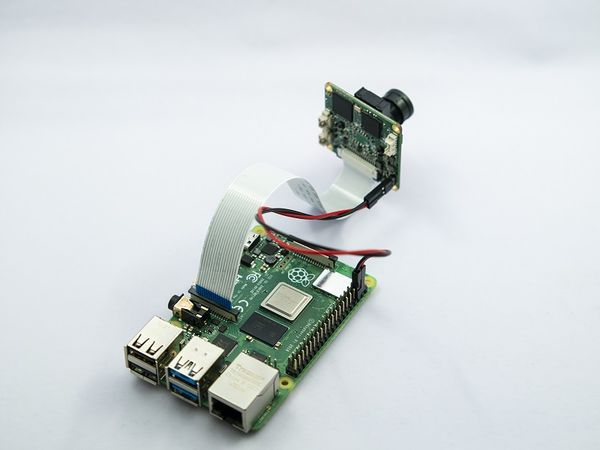
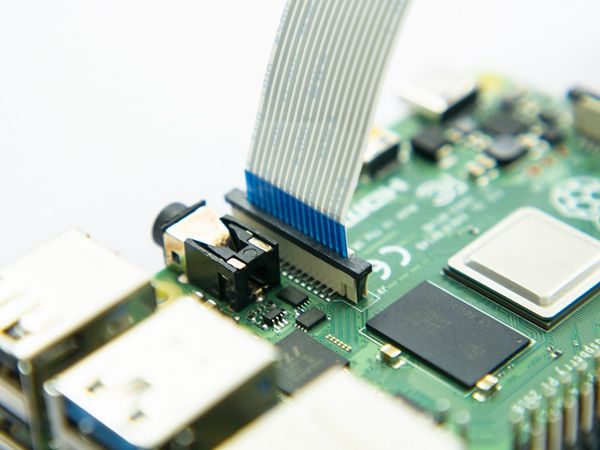
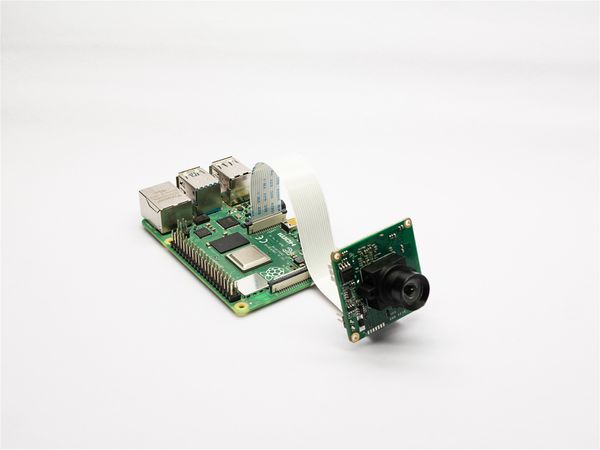
- Connect the CS-MIPI-X Camera Module the CSI-2 port using FFC Cable(type B).
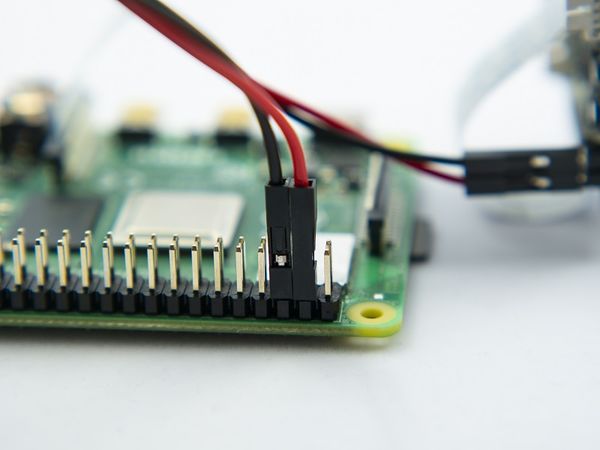
- Connect Dupont Wire as shown below. CS-MIPI-X need an addtional power.
- Startup RaspberryPi.
- The default power supply mode of CS-MIPI-SC132 is 3.3V via FFC cable, and there is no need to plug in red and black power cable.
4 RaspberryPi System Setup and Configuration
- Setup RasapberryPi System,reference this link.
- Go to the main menu and open the Raspberry Pi Configuration tool. Enable Camera and I2C interface.
sudo raspi-config
- Enable SSH and Samba services.
5 Sofware Toolkits Install
5.1 Toolkits downloading
There are two way to install software toolkits.
- 1. Clone from github
git clone https://github.com/veyeimaging/raspberrypi.git
- 2. Downloading from github (link here), upload to RPI using samba or USB disk.
5.2 Toolkits Overview
Software toolkits contains threeparts. veye_raspcam is raspcam alike Video Stream Toolkits, D_mipi_rpi is D-SDK Video Stream Toolkits, i2c_cmd is Video Control Toolkits.
- Video Stream Tookkits provides real-time display, capture, video recording, etc.
- Video Control Toolkits is a shell script which provides ISP parameters configuration capbility.
- Both is Open Source.
6 Video Stream Toolkits Manual
6.1 Video format
veye type like Video Stream Toolkits support multiple video formats,such as 1080p@30fps,720p@60fps etc..
Please use cs_mipi_i2c.sh cmd videofmtcap,videofmt to query and set the video format before using Video Stream Toolkits.
6.1.1 mode 1 :use -md option
-md option indicat which format to use,default 0。
| md Value | Video Format |
|---|---|
| 0 | 1080p@30fps |
| 1 | 720p@60fps |
| 2 | VGA@130fps |
6.1.2 mode 2 :use -w and -h option
-w option indicat width of current video width, -h option indicat height of current video width.
6.2 veye_raspcam: raspcam alike toolkits
cd raspberrypi/veye_raspcam/bin/
chmod +x *
VS toolkits provides several ELF file.
6.2.1 veye_raspipreview (realtime preview)
./veye_raspipreview -md 1 -t 20000 -p '0,0,1280,720'
Dispaly real-time video(720p@60) to HDMI output,preview window is 1280*720, last 20 seconds.
./veye_raspipreview -t -1
If t is -1, Show continuous Real-time display to HDMI output,full screen.
6.2.2 veye_raspivid (video encoding and record)
./veye_raspivid -t 5000 -w 1280 -h 720 -fps 60 -stm -o ~/test.h264
Implement H.264 format encoding(720p@60) and record for 5 seconds,Record the stream data to file ~/test.h264.
At the same time,Dispaly real-time video to HDMI output.(use -n if you do not want preview)
6.2.3 veye_raspivid (stream over tcp using gstreamer,recommended)
RPI side
./veye_raspivid -b 4000000 -t 0 -o - | gst-launch-1.0 -v fdsrc ! h264parse ! rtph264pay config-interval=1 pt=96 ! gdppay ! tcpserversink host=x.x.x.x port=5000
H.264 encoding on bitrate 4Mbps,forever,listen on TCP port 5000.
PC side,using gstreamer(Powershell recommended)
gst-launch-1.0 -v tcpclientsrc host=x.x.x.x port=5000 ! gdpdepay ! rtph264depay ! avdec_h264 ! autovideosink sync=false
x.x.x.x is RPI IP address
gstreamer windows version download.
6.2.4 veye_raspivid (direct tcp stream with netcat,gstreamer etc..)
RPI side
./veye_raspivid -b 4000000 -t 0 -o - | nc -l -p 5000
H.264 encoding on bitrate 4Mbps,forever,listen on TCP port 5000.
PC side,using gstreamer(Powershell recommended)
./gst-launch-1.0 -v tcpclientsrc host=x.x.x.x port=5000 ! decodebin ! autovideosink
x.x.x.x is RPI IP address
gstreamer windows version download.
PC side, using mplayer
./mplayer -x 1280 -y 720 -geometry 0:0 -fps 200 -demuxer h264es -noborder ffmpeg://tcp://x.x.x.x:5000
x.x.x.x is RPI IP address
mplayer for windows download
6.2.5 veye_raspividyuv (YUV image record)
./veye_raspividyuv -t 200 -o /dev/shm/test.yuv
Record UYVY data to file /dev/shm/ directory(which is in DDR), time is 200ms.
6.2.6 veye_raspiraw (record 1 YUV image)
./veye_raspiraw -md 2 -t 200 -o /dev/shm/out.%04d.yuv
Record one UYVY data to file /dev/shm/ directory(which is in DDR).
6.2.7 veye_raspstillyuv(record YUV image)
./veye_raspistillyuv -md 1 -o /dev/shm/test.yuv
Capturing one image and save to /dev/shm directory(which is in DDR).1280*720 YUV420 I420 format.
./veye_raspistillyuv -tl 50 -t 1000 -o /dev/shm/test%d.yuv
Capturing one image every 50 milliseconds and save to /dev/shm directory(which is in DDR).1920*1080 YUV420 I420 format.
6.2.8 veye_raspistill(record JPG,BMP image)
./veye_raspistill -md 1 -o ~/test.jpg
Capturing one image and save to home directory.1280*720 JPG format.
./veye_raspistill -e bmp -tl 50 -t 1000 -o /dev/shm/test%d.bmp
Capturing one image every 50 milliseconds and save to /dev/shm directory(which is in DDR).1920*1080 BMP format.
./veye_raspistill -k -o ~/test%d.jpg -t 0
Display video to HDMI,capture jpg image using keyboard,Enter to capture,X Enter to quit.
veye_raspistill support preview,-n will not preview.
6.3 D-SDK Toolkits Manual
It contains three parts: C language SDK(libdmipicam.so),C language sample,Python language sample.
6.3.1 Install support package
sudo apt-get update && sudo apt-get install libopencv-dev
sudo apt-get install python-opencv
sudo apt-get install libzbar-dev
6.3.2 Video Format Description
D-SDK does not configure any parameters for the module. To config the module, please refer to: Video Control Toolkits Manual : CS-MIPI-X i2c。
The pvideofmt parameter of the D_init_camera_ex function needs to be consistent with the current module resolution mode.
./cs_mipi_i2c.sh -r -f videofmt
6.3.3 D-SDK
- interface:
opensource,D_mipicam.h
- compile:
./buildme
- install:
sudo install -m 644 ./libdmipicam.so /usr/lib/
6.3.4 C sample
- preview
Dispaly real-time video to HDMI output
- preview-dualcam
Dispaly real-time video to HDMI output for dual cameras(RPI CM)
- video
H.264 format encoding and record to file.
- capture
Capture one jpeg image.
- video2stdout
H.264 format encoding and send to stdout,which could be used by pipe. It's like veye_raspivid -o -.
./video2stdout | nc -l -p 5000
- capture_yuv
Capture one yuv image.
- capture-dualcam
Capture jpeg images for dual cameras.
- yuv_stream
Shows how to get yuv stream.
- capture2opencv
Shows how to get yuv stream,transfer to opencv format and display it.
- qrcode_detection
Shows how to get yuv stream,transfer to opencv format and display it and detect QR code.
6.3.5 Python sample
- preview.py
Dispaly real-time video to HDMI output
- capture.py
Capture one jpeg image.
- capture_yuv.py
capture_yuv
- video.py
H.264 format encoding and record to file.
- capture2opencv.py
Shows how to get yuv stream,transfer to opencv format and display it.
7 Video Control Toolkits Manual
On Raspberry Pi, We use I2C-0 as control bus for VEYE Camera Module. We provide a Shell Script — camera_i2c_config— to config pin usage.
Video Control Toolkits Manual : CS-MIPI-X i2c
The new version of PiOS use i2c-10. If i2c-0 doesn't work, try -b 10.
8 RPI Computer Module and RPI Zero Additional Info
Please refer to : RPI Computer Module and RPI Zero Additional Info.
