Mv series camera appnotes 4 rpi/zh
1 概述
MV系列相机是为工业领域的AI应用推出的相机。其使用MIPI CSI-2接口,尤其适合嵌入式运算平台使用。它具备丰富的数据格式和触发特性,极低的延时,极高的带宽和可靠的稳定性。
本文介绍了如何在树莓派平台使用MV系列相机。
1.1 支持的模组
| 系列 | 型号 | 状态 |
|---|---|---|
| MV系列 | MV-MIPI-IMX178M | 完成 |
| MV系列 | MV-MIPI-SC130M | 完成 |
| MV系列 | MV-MIPI-IMX287M | 完成 |
| MV系列 | MV-MIPI-IMX296M | 完成 |
| MV系列 | MV-MIPI-IMX265M | 完成 |
| MV系列 | MV-MIPI-IMX264M | 完成 |
| MV系列 | MV-MIPI-GMAX4002M | 完成 |
| RAW系列 | RAW-MIPI-SC132M | 完成 |
| RAW系列 | RAW-MIPI-IMX462M | 完成 |
| RAW系列 | RAW-MIPI-AR0234M | 完成 |
| RAW系列 | RAW-MIPI-SC535M | 完成 |
2 硬件准备及安装
2.1 MV系列摄像头使用ADP-MV1的连接方式
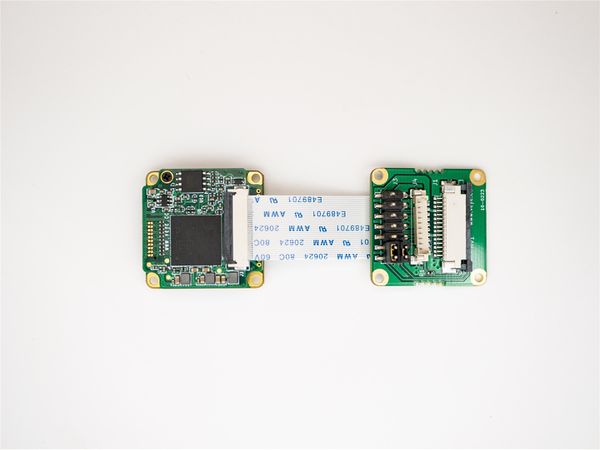
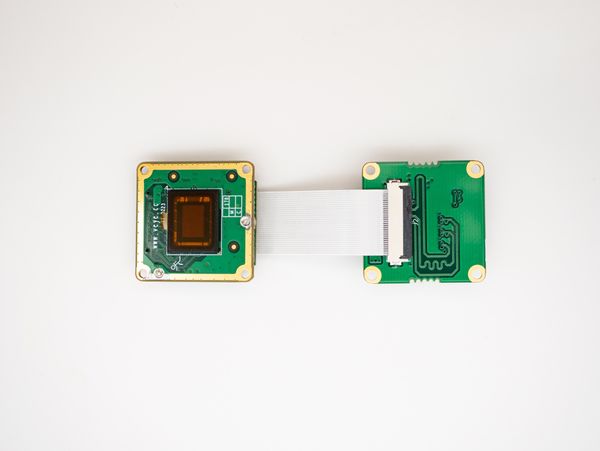
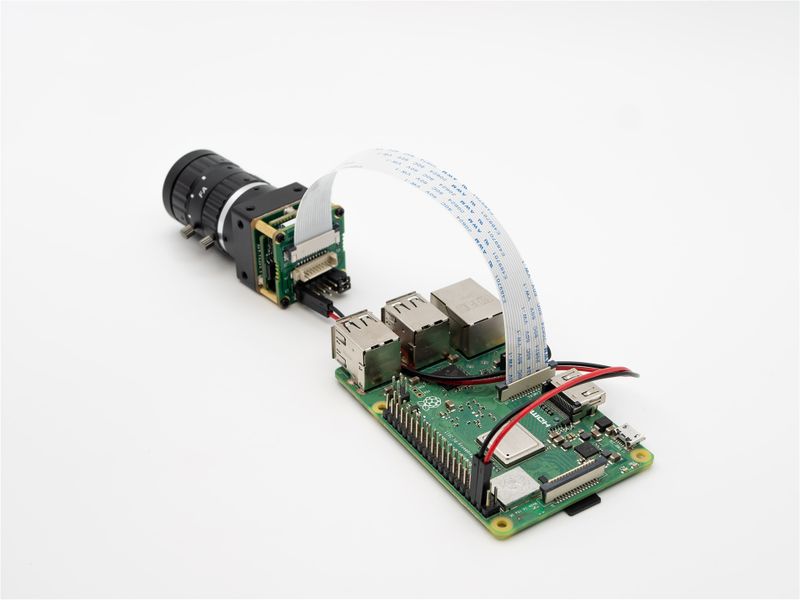
MV系列相机需要使用ADP-MV1转接板才能连接到树莓派。
2.1.1 MV系列摄像头与ADP-MV1的连接
二者使用0.5mm间距*30P的FFC异面线连接,注意接触面向外。
| TOP | BOTTOM |
|---|---|
2.1.2 供电
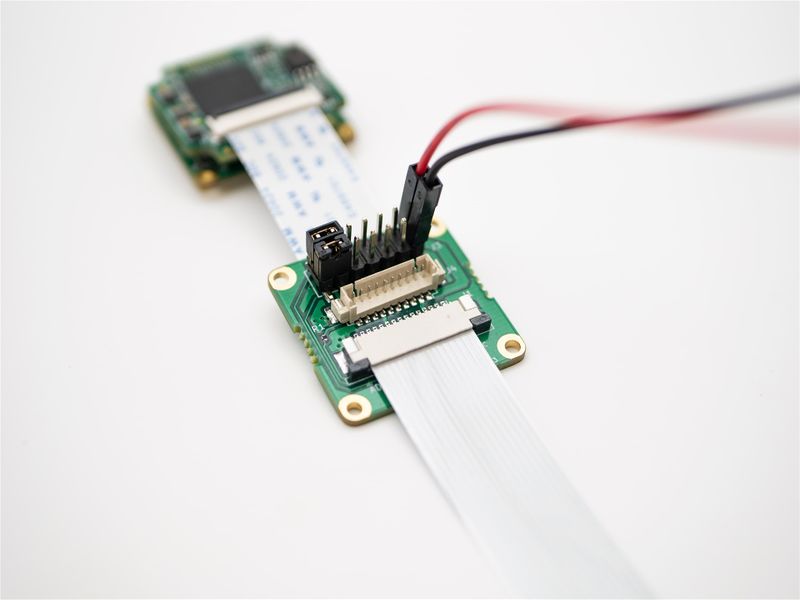
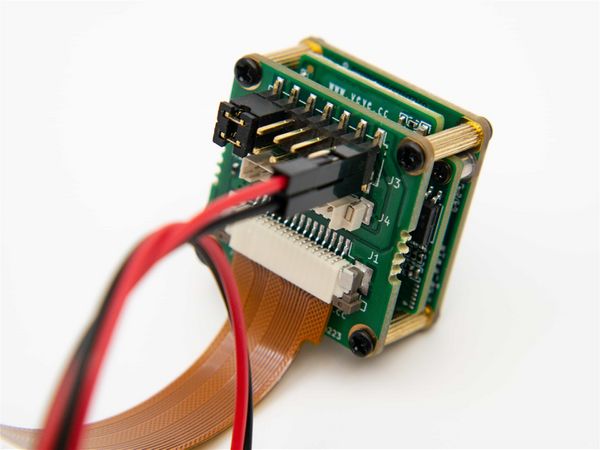
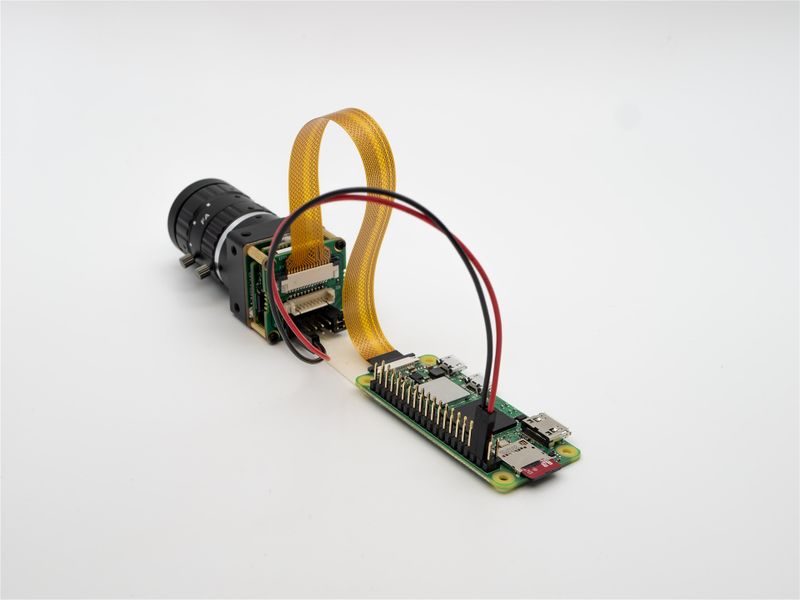
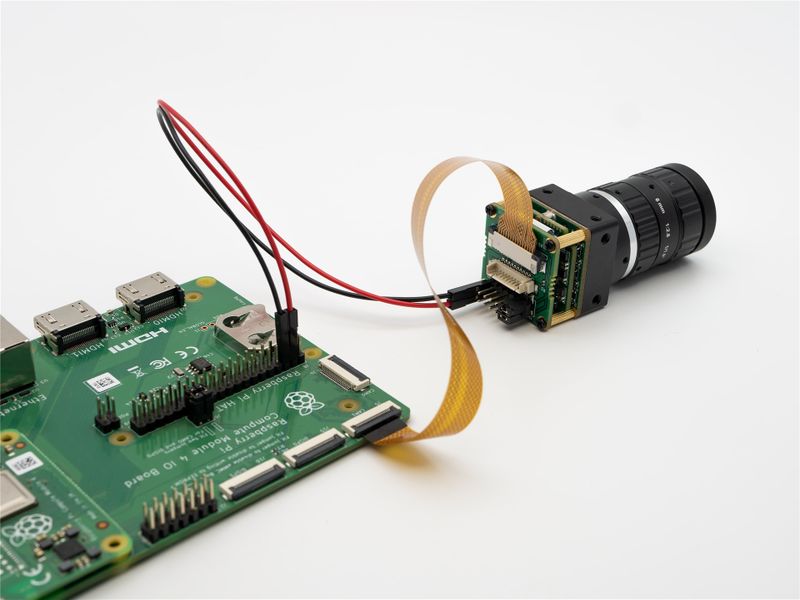
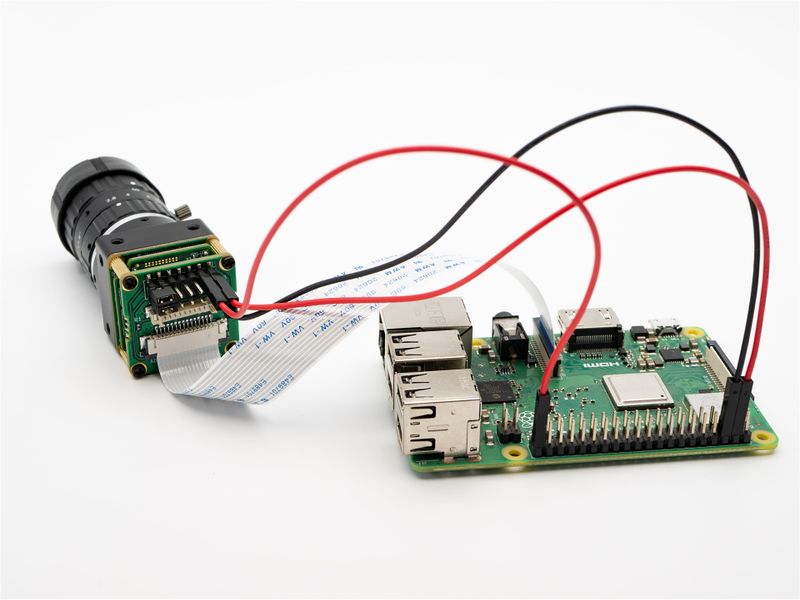
ADP-MV1需要独立的5V供电,可以使用杜邦线直接从树莓派主板取电。
2.1.3 树莓派5
二者使用15P转22P的FFC同面线连接,注意接触面安装方向。
| TOP | BOTTOM |
|---|---|
2.1.4 树莓派Model B和Model B+
二者使用1mm间距*15P的FFC异面线连接,注意接触面安装方向。
2.1.5 树莓派Zero,Zero W和Computer Module
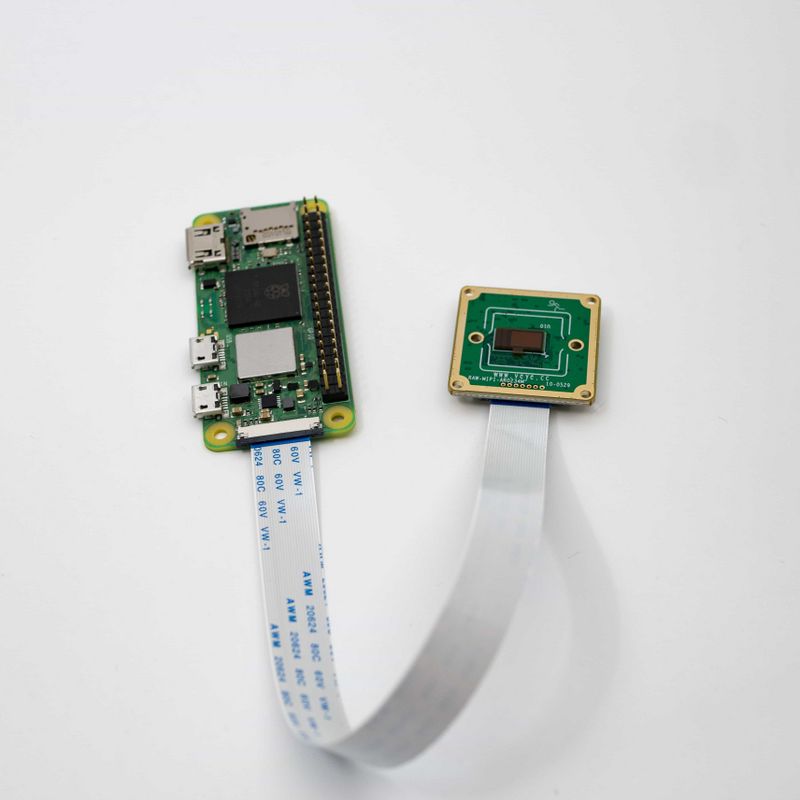
二者使用15P转22P的FFC同面线连接,注意接触面安装方向。
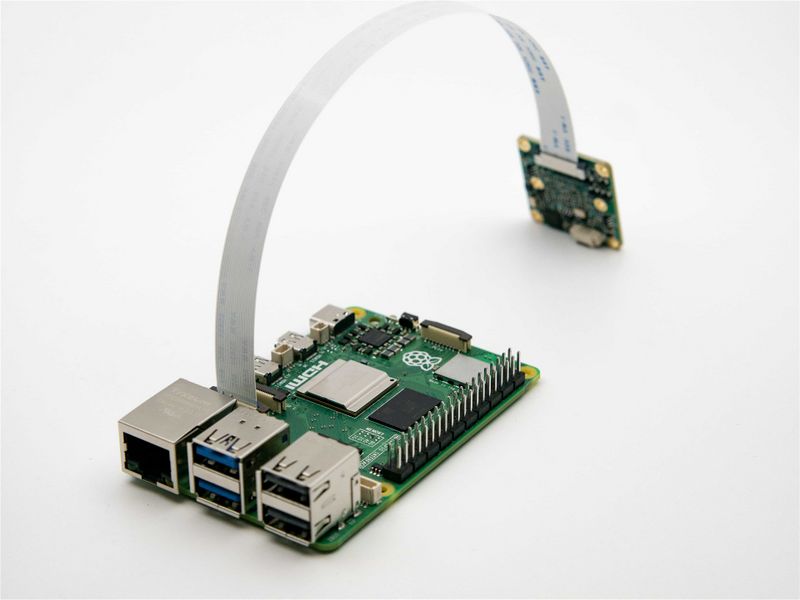
2.2 RAW系列摄像头连接到树莓派
2.2.1 树莓派5
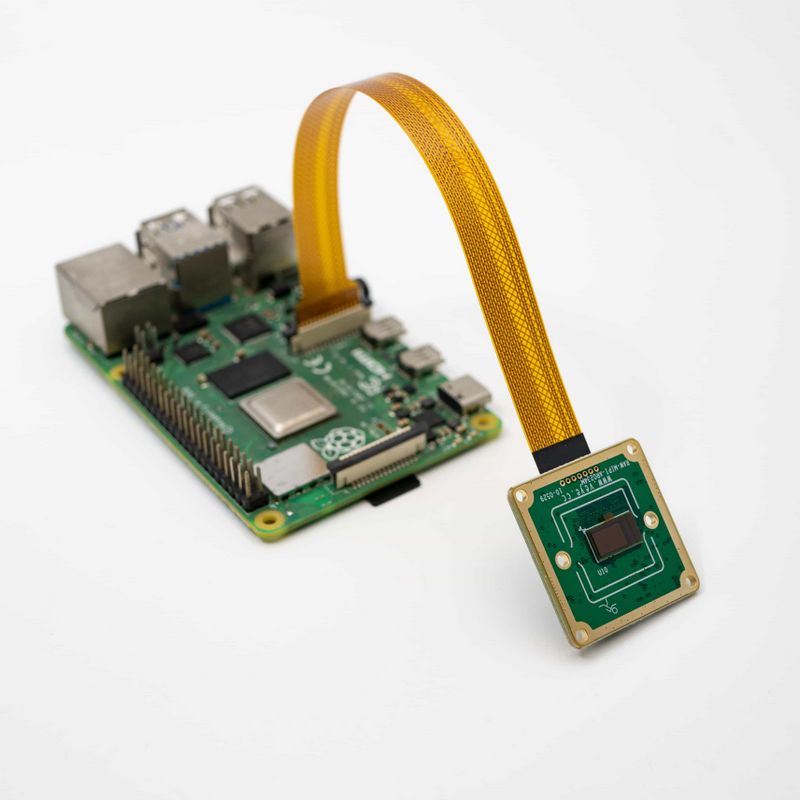
RAW-MIPI-SC132M使用15to22pin同面FFC线,其他RAW系列相机使用22pin异面FFC线。
2.2.2 树莓派Model B和Model B+
RAW-MIPI-SC132M使用15pin异面FFC线,其他RAW系列相机使用15to22pin同面FFC线。
2.2.3 树莓派Zero,Zero W和Computer Module
RAW-MIPI-SC132M使用15to22pin同面FFC线,其他RAW系列相机使用22pin异面FFC线。
3 piOS的配置
具体安装树莓派系统方法请参考官方文档,详见:Install raspberrypi guide。
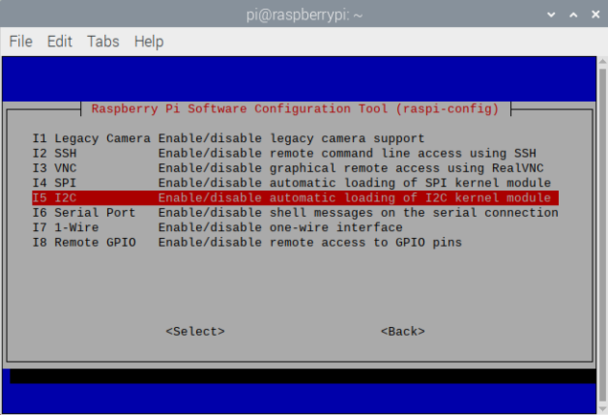
接通电源后,树莓派系统启动,初始树莓派系统中Camera 和 I2C都处于未启用状态。开机后我们需要将其手动打开,执行命令
sudo raspi-config
进入Interface Options,启用I2C,然后重启树莓派。
建议启用树莓派系统的ssh服务及samba服务,这里不再赘述树莓派系统如何开启ssh和samba服务。
4 V4L2模式和Legacy模式介绍
在最新的树莓派bookworm系统中,已经去掉了对Legacy模式的支持。建议客户使用V4L2模式。
4.1 libcamera以及V4L2模式
现在piOS已全面切换为libcamera-stack模式。
libcamera-stack本质上以实现isp功能为核心,这点是MV系列相机不需要的。因此,我们采用了V4L2模式,而不是使用libcamera-stack。
与libcamera-stack相同,我们的V4L2模式,也实现了linux驱动层标准的V4L2驱动。基于此驱动,应用层可以直接开发程序获取图像并进行进一步处理。
4.2 Legacy模式
传统模式,依赖博通的GPU进行图像处理。传统的raspicam软件集即采用此模式。此模式缺点是封闭。GPU端是闭源的,无法自由接入sensor。树莓派组织已经全面转向libcamera camera stack。
但是此模式依然有存在的价值:
- 更多的使用GPU资源,降低CPU负载。这点对于性能比较差的早期版本树莓派很有用。
- 可以简单直接的获取图像数据到应用层,无需驱动层的支持。这点对于不依赖树莓派做isp的相机尤其有用。
- libcamera现在还缺乏一些功能支持。
有两种方法可以使用Legacy模式:
- 使用Legacy版本的piOS。
- 对于bullseye版本piOS,
raspi-config中打开Legacy Camera选项。
由于两种工作模式不能共存,因此使用V4L2模式时需要关闭Legacy模式。
5 V4L2模式用法
我们在这个github仓库保存了v4l2模式的代码。
国内用户可以使用gitee仓库。
5.1 下载驱动包
wget https://github.com/veyeimaging/raspberrypi_v4l2/releases/latest/download/raspberrypi_v4l2.tgz
国内用户可通过gitee下载:
https://gitee.com/veyeimaging/raspberrypi_v4l2/releases/
5.2 安装驱动
tar -xzvf raspberrypi_v4l2.tgz
cd raspberrypi_v4l2/release/
chmod +x *
- 对于树莓派5
sudo ./install_driver_rpi5.sh veye_mvcam
会在/boot/config.txt中安装CAM1和CAM0两个dtvoerlay。
- 其他树莓派
sudo ./install_driver.sh veye_mvcam
然后重启树莓派。
备注:如果提示无法找到对应版本的驱动,说明我们没有提供对应您的piOS版本编译后的驱动程序。请尝试从源码编译。
5.2.1 mvcam使用4lane模式
对于mvcam,默认的dtbo是2lane的,如需使用4lane模式,请先确认你的树莓派主板和相机都支持4lane。如树莓派或者相机不支持4lane模式,而误用4lane模式dtbo,则会导致无法正确取图。
然后,请在驱动安装完成后,额外执行:
sudo cp driver_bin/$(uname -r)/veye_mvcam_4lane.dtbo /boot/overlays/veye_mvcam.dtbo
5.3 卸载驱动
如需更换为Legacy模式,或者想要更换成其他摄像头模组型号的驱动,必须要先卸载现在的驱动。
sudo ./uninstall_driver.sh veye_mvcam
5.4 系统状态验证
以MV-MIPI-IMX178M为例:
dmesg | grep mvcam
可以看到linux启动阶段probe到的相机型号和以及相机的版本号:
camera is: MV-MIPI-IMX178M
firmware version: 0x1080102
并且/dev/video0 节点存在,证明摄像头状态正常。
5.5 veye_viewer
veye_viewer是一个开源的,基于QT5的客户端软件。
代码以及使用请参考:https://github.com/veyeimaging/veye_viewer。
国内用户可访问gitee仓库。
5.6 状态检测并配置环境变量
在这里,我们提供了一个mv_probe.sh脚本,用于自动检测识别到的相机并将相机默认的型号、宽、高、帧率等信息配置到环境变量中。
使用方法是:
source ./mv_probe.sh
一个典型的输出如下:
$ source ./mv_probe.sh
The mvcam driver is loaded on i2c-10, but the camera is not detected!
Found veye_mvcam camera on i2c-11.
Setenv CAMERAMODEL = RAW-MIPI-SC535M
Setenv FPS = 49
Setenv WIDTH = 2432
Setenv HEIGHT = 2048
可以通过 echo $CAMERAMODEL来验证环境变量的输出结果。注意,此环境变量只对当前会话有效。
注意:此脚本需要mvcam的驱动版本大于等于1.1.06才可以支持。
如你使用的驱动版本小于1.1.06,或者你希望使用不同于当前值的宽、高、帧率。请参考相机模组的手册,手动配置如下WIDTH HEIGHT FPS环境变量,否则可能导致后面的程序运行不正常。如:
export WIDTH=2432
export HEIGHT=2048
export FPS=50
5.7 树莓派5的配置
在树莓派5上,驱动程序现在使用media control API,我们必须先正确设置media graph。这包括正确设置media pad的格式并正确链接它们。
我们提供了一系列脚本实现这个功能,保存在rpi5_scripts目录。
- ./find_entity.sh
$ ./find_entity.sh
Found mvcam @ i2c-4 entity on /dev/media3
Plese get frame from /dev/video0 and use /dev/v4l-subdev2 for camera setting.
Found mvcam @ i2c-6 entity on /dev/media0
Plese get frame from /dev/video8 and use /dev/v4l-subdev5 for camera setting.
树莓派5重启之后,相机的media node,video node可能发生变化,因此,建议执行后续操作前执行./find_entity.sh以明确设备节点。
上述提示信息中,可以看到系统插入了两个相机,以及每个相机的对应的设备节点。
i2c-4对应板子上的CAM1插口,i2c-6对应板子上的CAM0插口。
- media_setting_rpi5.sh
./media_setting_rpi5.sh
This is a Raspberry Pi 5.
Kernel version is 6.6.51, do not support unpacked format.
Usage: ./media_setting_rpi5.sh veyecam2m/csimx307/cssc132/mvcam -fmt [UYVY/RAW8/RAW10/RAW12] -x [roi_x] -y [roi_y] -w [width] -h [height] -c [cam 0|1]
This shell script is designed to detect the connection of a camera on Raspberry Pi 5.
It utilizes media-ctl and v4l2-ctl commands to configure the linking relationships and data formats of the media pad.
Once completed, you can directly use /dev/video0 or /dev/video8 to obtain image data.
在进行后续操作前,必须执行此脚本以完成参数的配置。
举例来说,对于接到CAM0口的RAW-MIPI-AR0234M:
./media_setting_rpi5.sh mvcam -fmt RAW8 -x 0 -y 0 -w 1920 -h 1200 -c 0
5.8 v4l2-ctl 应用范例
5.8.1 安装v4l2-utils
sudo apt-get install v4l-utils
5.8.2 yavta安装
git clone git://git.ideasonboard.org/yavta.git
cd yavta;make
5.8.3 使用v4l2-ctl配置参数
5.8.3.1 列出相机支持的数据格式
v4l2-ctl --list-formats-ext
ioctl: VIDIOC_ENUM_FMT
Type: Video Capture
[0]: 'GREY' (8-bit Greyscale)
Size: Discrete 3088x2064
[1]: 'Y10P' (10-bit Greyscale (MIPI Packed))
Size: Discrete 3088x2064
[2]: 'Y10 ' (10-bit Greyscale)
Size: Discrete 3088x2064
[3]: 'Y12P' (12-bit Greyscale (MIPI Packed))
Size: Discrete 3088x2064
[4]: 'Y12 ' (12-bit Greyscale)
Size: Discrete 3088x2064
注:对于树莓派5,实际支持的图像格式取决于相机能力,而不是此处的列表。
5.8.3.2 列出驱动中实现的相机的可配置参数
v4l2-ctl -L
User Controls
trigger_mode 0x00981901 (int) : min=0 max=2 step=1 default=0 value=0 flags=volatile, execute-on-write
trigger_src 0x00981902 (int) : min=0 max=1 step=1 default=1 value=1 flags=volatile, execute-on-write
soft_trgone 0x00981903 (button) : flags=write-only, execute-on-write
frame_rate 0x00981904 (int) : min=1 max=60 step=1 default=30 value=30 flags=volatile, execute-on-write
roi_x 0x00981905 (int) : min=0 max=1376 step=8 default=0 value=0
roi_y 0x00981906 (int) : min=0 max=1024 step=4 default=0 value=0
可以使用下面的方法设置和获取参数。
v4l2-ctl --set-ctrl [ctrl_type]=[val]
v4l2-ctl --get-ctrl [ctrl_type]
注:对于树莓派5,本节的所有使用v4l2-ctl配置参数的命令需要增加 -d参数来指明配置参数使用的subdev。
比如执行./media_setting_rpi5.sh或者./find_entity.sh的时候提示使用/dev/v4l-subdev2进行参数配置。
则v4l2-ctl -L需要变更为v4l2-ctl -L -d /dev/v4l-subdev2。
注:以上所有功能,均可使用mv_mipi_i2c.sh实现。
需要指出的是,以上参数在开始取图的状态均不可修改。下面进行逐个说明:
5.8.3.3 配置触发模式
v4l2-ctl --set-ctrl trigger_mode=[0-2]
0:流模式
1:普通触发模式
2:快速连续触发模式
5.8.3.4 配置触发源
v4l2-ctl --set-ctrl trigger_src=[0-1]
0: 软触发
1: 硬触发
5.8.3.5 软触发一次
v4l2-ctl --set-ctrl soft_trgone=1
5.8.3.6 设置帧率
v4l2-ctl --set-ctrl frame_rate=[1-max]
随分辨率的调整,最大帧率会自动更新。
5.8.3.7 设置ROI
- 方法1,使用selection
v4l2-ctl --set-selection=target=crop,top=0,left=0,width=$WIDTH,height=$HEIGHT
设置roi后,最大帧率会自动调整。
注:此方法不适用于树莓派5。
- 方法2,使用自定义roi_x,roi_y配合
--set-fmt-video
v4l2-ctl --set-ctrl roi_x=0
v4l2-ctl --set-ctrl roi_y=0
v4l2-ctl --set-fmt-video=width=$WIDTH,height=$HEIGHT
备注:对于树莓派5,可以直接使用media_setting_rpi5.sh脚本完成roi的配置,因为media_setting_rpi5.sh脚本中已经包含roi配置。
5.9 流模式
5.9.1 设置ROI
v4l2-ctl --set-ctrl roi_x=0
v4l2-ctl --set-ctrl roi_y=0
v4l2-ctl --set-fmt-video=width=$WIDTH,height=$HEIGHT
5.9.2 设置帧率
v4l2-ctl --set-ctrl frame_rate=$FPS
5.9.3 可使用如下命令进行帧率统计
v4l2-ctl -d /dev/video0 --set-fmt-video=width=$WIDTH,height=$HEIGHT,pixelformat=GREY --stream-mmap --stream-count=-1 --stream-to=/dev/null
5.9.4 保存图片到文件
- raw8格式
v4l2-ctl -d /dev/video0 --set-fmt-video=width=$WIDTH,height=$HEIGHT,pixelformat=GREY --stream-mmap --stream-count=1 --stream-to="y8-${WIDTH}x${HEIGHT}.raw"
或者
./yavta -c1 -F"y8-${WIDTH}x${HEIGHT}.raw" --skip 0 -f Y8 -s "${WIDTH}x${HEIGHT}" /dev/video0
- raw10格式
v4l2-ctl -d /dev/video0 --set-fmt-video=width=$WIDTH,height=$HEIGHT,pixelformat='Y10 ' --stream-mmap --stream-count=1 --stream-to="y10-${WIDTH}x${HEIGHT}.raw"
- raw12格式
v4l2-ctl -d /dev/video0 --set-fmt-video=width=$WIDTH,height=$HEIGHT,pixelformat='Y12 ' --stream-mmap --stream-count=1 --stream-to="y12-${WIDTH}x${HEIGHT}.raw"
由于Raspberry Pi为图像申请的内存,宽度为32对齐,高度为16对齐,所以3088*2064的图像将被保存为3104*2064大小。
图片格式请参考下面:raw data图片格式说明 章节。
5.9.5 实时预览
在最新版树莓派piOS,vlc进行播放现在有问题,不能使用,请使用qv4l2代替。
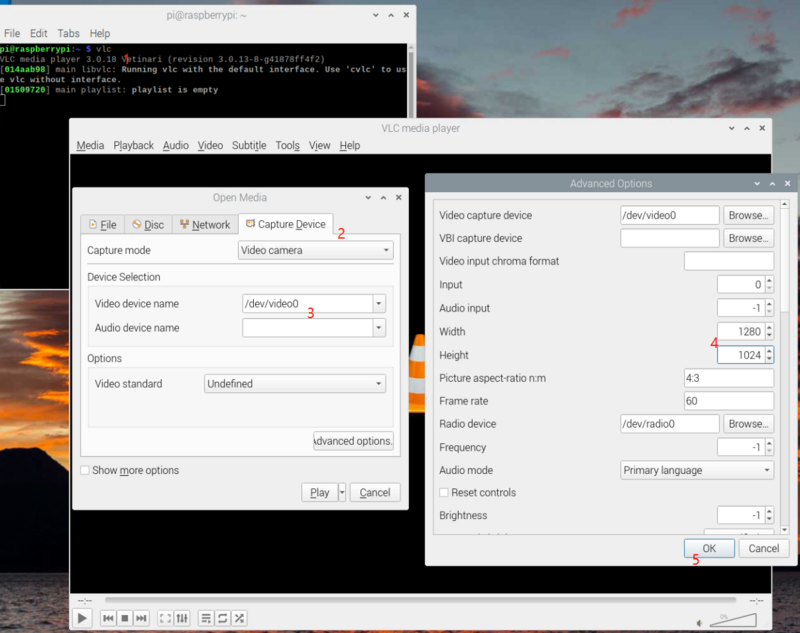
5.9.5.1 使用vlc播放图像
1. Open VLC with command line vlc , or click the icon to launch.
2. Hit the ▶(Play) button to call the open media window.
3. In Capture Device >> Device Selection >> Video device name, select the camera video node.
4. Hit Advanced Options... button
5. Type in the width and height, for example, 1280 and 1024.
6. Hit OK to save the settings and see the video feed.
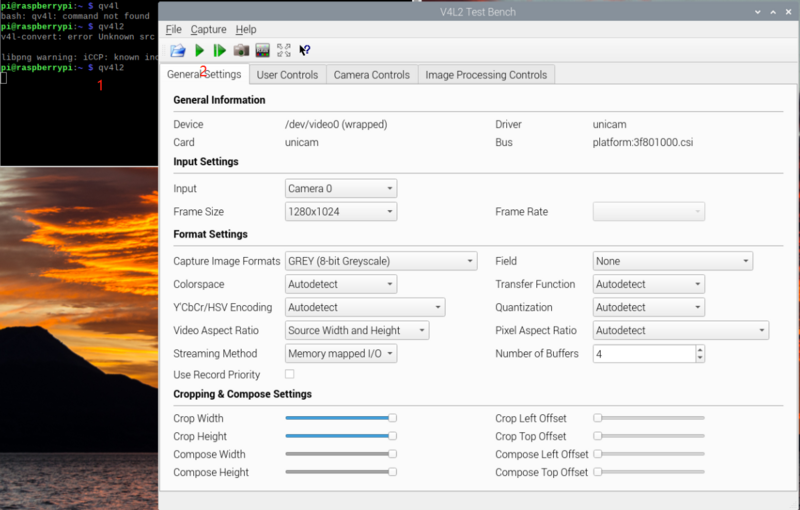
5.9.5.2 使用qv4l2播放图像
首先安装qv4l2
sudo apt install qv4l2
1. Open VLC with command line vlc to launch.
2. Hit the ▶(Play) button to call the open media window.
5.9.5.3 使用opencv预览GREY格式图像
- install opencv
pip uninstall opencv-python
sudo apt install python3-opencv
- 我们提供了一个简单的sample实现此功能:
python ./v4l2dev_2_opencv_show_grey.py --width 640 --height 480 --fps 30
对于树莓派5,需要增加一个--ctldev /dev/v4l-subdev*参数用于指明配置参数的subdev。
5.9.5.4 使用gstreamer预览GREY格式图像
export DISPLAY=:0
gst-launch-1.0 v4l2src device=/dev/video0 ! video/x-raw,format=GRAY8,width=$WIDTH,height=$HEIGHT,framerate=$FPS/1 ! videoconvert ! autovideosink
5.10 触发模式
本节以IMX178为例,讲述一下触发模式的配置和使用。其他摄像头,参考流模式的宽高推论即可。
5.10.1 设置ROI和帧率
v4l2-ctl --set-ctrl roi_x=0
v4l2-ctl --set-ctrl roi_y=0
v4l2-ctl --set-fmt-video=width=$WIDTH,height=$HEIGHT
v4l2-ctl --set-ctrl frame_rate=$FPS
5.10.2 软触发模式
5.10.2.1 设置模式
v4l2-ctl --set-ctrl trigger_mode=1
v4l2-ctl --set-ctrl trigger_src=0
5.10.2.2 开始取图
v4l2-ctl --set-fmt-video=width=$WIDTH,height=$HEIGHT,pixelformat=GREY --stream-mmap --stream-count=5 --stream-to="y8-${WIDTH}x${HEIGHT}.raw"
5.10.2.3 进行软触发操作
在其他的shell终端,可以多次执行下面命令进行多次触发。
v4l2-ctl --set-ctrl soft_trgone=1
5.10.3 硬触发模式
下面以使用树莓派GPIO21为模拟触发源,上升沿触发为例。
可以使用mv_mipi_i2c.sh脚本进行丰富的触发参数设置。
5.10.3.1 硬件连接
5.10.3.2 设置模式
v4l2-ctl --set-ctrl trigger_mode=1
v4l2-ctl --set-ctrl trigger_src=1
5.10.3.3 开始取图
v4l2-ctl --set-fmt-video=width=$WIDTH,height=$HEIGHT,pixelformat=GREY --stream-mmap --stream-count=5 --stream-to="y8-${WIDTH}x${HEIGHT}.raw"
5.10.3.4 进行硬触发操作
在其他的shell终端,可以多次执行下面命令进行多次触发。
python gpio_trigger.py
Note:触发脚本链接。
5.11 CM4的补充说明
cm4支持两路摄像头同时使用,采用上面的步骤安装的dtbo将只能使用CAM1。如需使用两路摄像头,请按如下步骤:
5.11.1 硬件连接
参考树莓派这个说明,将J6进行短接。
5.11.2 更新dt-blob.bin
sudo wget https://datasheets.raspberrypi.com/cmio/dt-blob-dualcam.bin -O /boot/dt-blob.bin
5.11.3 对于Buster系统(kernel5.10)
更新双摄像头的dtbo,
以mvcam为例:
sudo cp raspberrypi_v4l2/release/driver_bin/$(uname -r)/veye_mvcam-cm4.dtbo /boot/overlays/veye_mvcam.dtbo
sudo reboot
5.11.4 对于Bullseye系统(kernel5.15+)
手动编辑/boot/config.txt文件,增加一行dtoverlay=[camera],cam0,如下所示:
[all]
dtparam=i2c_vc=on
dtoverlay=veye_mvcam
dtoverlay=veye_mvcam,cam0
5.11.5 设备文件说明
CM4模块采用两路I2C分别与两个摄像头通信。
| description | i2c bus num | lane num | video node |
|---|---|---|---|
| CAM0 | 0 | 2lane | video0 |
| CAM1 | 10 | 2lane or 4lane | video2(Buster),video1(Bullseye) |
注:只连一个摄像头,无论CAM0还是CAM1,都是video0。
5.12 从源代码编译驱动方法
请参考:树莓派平台上摄像头驱动源码编译指南。
6 Legacy模式用法
我们在这个github仓库中存储legacy模式的代码。
国内用户可以使用gitee仓库。
6.1 下载软件包
git clone https://github.com/veyeimaging/mvcam_raspberrypi.git
增加可执行权限
chmod +x -R ./mvcam_raspberrypi/
6.2 软件包主要内容介绍
camera_i2c_config:自动识别不同的树莓派板型,并控制power on 引脚给摄像机供电。
mv_raspicam:实现图像预览、图片保存等功能。
mv_mipi_i2c.sh:通过i2c协议读取和设置相机参数的脚本。
veye_i2c_upgrade:相机固件升级工具。
6.3 相机上电
./camera_i2c_config
相机上电后,可以执行:
i2cdetect -y 10
出现0x3b的设备,则表明相机已启动,并且i2c通道正常工作。
6.4 视频预览
./mv_raspicam -t -1 -md 0
其中 -md指明像素数据格式:
| -md option | data type |
|---|---|
| 0 | 8bit Y |
| 1 | 10bit Y |
| 2 | 12bit Y |
-roi可以指明需要的roi尺寸。
对于宽度超过1920的尺寸,mv_raspicam 会先将图像缩小一倍,然后进行预览显示。
6.5 保存图片
./mv_raspicam -t 1000 -md 0 -sr 10 -o /dev/shm/y8-3104x2064_%04d.raw
-sr是存储图片的间隔,这里每间隔10张图片保存一张。
-t 1000,单位是ms,这里表示1秒。
完成后在/dev/shm/目录下会保存下几个文件。
6.6 触发模式
本章节需要使用mv_mipi_i2c.sh,请参考下面相关i2c参数配置方法章节。
6.6.1 软触发
6.6.1.1 设置模式
./mv_mipi_i2c.sh -w -f trgmode -p1 1
./mv_mipi_i2c.sh -w -f trgsrc -p1 0
6.6.1.2 设置触发属性
可以设置触发数量,触发间隔等。下面设置单次触发5张,每张间隔1毫秒。
./mv_mipi_i2c.sh -w -f trgnum -p1 5
./mv_mipi_i2c.sh -w -f trginterval -p1 1000
6.6.1.3 开始取图
./mv_raspicam -t -1 -md 0
6.6.1.4 进行软触发操作
在其他的shell终端,可以多次执行下面命令进行多次触发。
./mv_mipi_i2c.sh -w -f trgone
6.6.2 硬触发
6.6.2.1 设置模式
本次以普通触发为例
./mv_mipi_i2c.sh -w -f trgmode -p1 1
./mv_mipi_i2c.sh -w -f trgsrc -p1 1
6.6.2.2 设置触发属性
设置触发数量为2张。
./mv_mipi_i2c.sh -w -f trgnum -p1 2
设置上升沿触发
./mv_mipi_i2c.sh -w -f trgedge -p1 0
此外,还可以对硬触发设置丰富的触发属性,如触发延迟、信号过滤等。
6.6.2.3 开始取图
./mv_raspicam -t -1 -md 0
6.6.2.4 进行硬触发操作
python gpio_trigger.py
Note:触发脚本链接。
6.7 CM4的补充说明
关于硬件连接、dtbo以及i2cbus的描述,请参考前面的章节。
6.7.1 mv_raspicam分别访问两个camera的方法:
- 预览CAM0
./mv_raspicam -t -1 -c 0 -y 0
- 预览CAM1
./mv_raspicam -t -1 -c 1 -y 10
7 raw data图片格式说明
7.1 具有填充位的图片格式
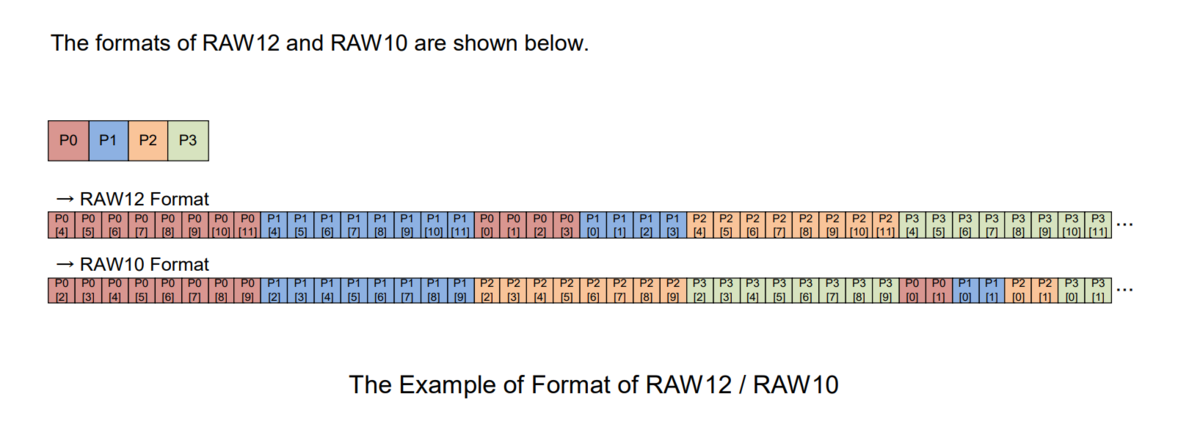
对于10bit深度、12bit深度的像素数据,总是使用两个字节来存储一个像素。用不到的高位以0填充。V4L2标准的'Y10 ' (10-bit Greyscale),'Y12 ' (12-bit Greyscale)格式都是以这种方式存储的。
这种存储方式方便软件处理,缺点是空间占用较大。
7.2 紧密排列的图片格式
mv_raspicam保存的数据格式就是mipi总线上的数据格式,像素和像素之间不会进行空bit位填充。
V4L2标准的'Y10P' (10-bit Greyscale (MIPI Packed)),'Y12P' (12-bit Greyscale (MIPI Packed))格式都是以这种方式存储的。
7.2.1 紧密排列图片大小
Buffersize= ALIGN_UP(width*bit_depth/8,32)*ALIGN_UP(height,16)
行buffersize需要是32字节的整数倍;列buffersize是16字节的整数倍。
举例来说,3088*2064@8bit的图像大小是6406656; 3088*2064@10bit的图像大小是7991808;3088*2064@12bit 的图像大小是9576960。
7.3 转换工具
我们编写了一个小工具:pixel_layer_convert,可以很方便的将紧密排列的图片转为具有填充位的图片。
比如下面的命令,可以将一个3088宽度的packed raw10 图片转为unpacked raw10。
./pixel_layer_convert -I Y10P -i y10-3088x2064_0001.raw -o y10-3088x2064_0001_new.raw -w 3088
7.4 raw图片播放器
推荐使用vooya作为播放器,支持GREY, 和具有填充位的图片格式。
Y8文件可以用这个播放器: YUV Displayer Deluxe。
7.5 树莓派官方对于Packed format和Unpacked format的解释
7.5.1 Packed format details
The packed format uses less storage for pixel data.
On Raspberry Pi 4 and earlier devices, the packed format packs pixels using the MIPI CSI-2 standard. This means:
- 10-bit camera modes pack 4 pixels into 5 bytes. The first 4 bytes contain the 8 most significant bits (MSBs) of each pixel, and the final byte contains the 4 pairs of least significant bits (LSBs).
- 12-bit camera modes pack 2 pixels into 3 bytes. The first 2 bytes contain the 8 most significant bits (MSBs) of each pixel, and the final byte contains the 4 least significant bits (LSBs) of both pixels.
On Raspberry Pi 5 and later devices, the packed format compresses pixel values with a visually lossless compression scheme into 8 bits (1 byte) per pixel.
7.5.2 Unpacked format details
The unpacked format provides pixel values that are much easier to manually manipulate, at the expense of using more storage for pixel data.
On all devices, the unpacked format uses 2 bytes per pixel.
On Raspberry Pi 4 and earlier devices, applications apply zero padding at the most significant end. In the unpacked format, a pixel from a 10-bit camera mode cannot exceed the value 1023.
On Raspberry Pi 5 and later devices, applications apply zero padding at the least significant end, so images use the full 16-bit dynamic range of the pixel depth delivered by the sensor.
8 shell脚本进行参数配置
我们提供了shell脚本来配置参数。
https://github.com/veyeimaging/raspberrypi_v4l2/tree/main/mv_tools_rpi
9 参考资料
10 问题反馈
我们致力于为嵌入式平台的图像应用提供更丰富的可能性。因此,我们在嵌入式平台的软件基于开源的原则而进行。
如对我们现有软件有任何的问题、建议,欢迎提交到论坛:,或者给我们的技术人员发邮件xumm#csoneplus.com。
11 本文修改记录
- 2025-07-02
增加veye_viewer软件的描述。
- 2025-03-23
增加对MV-MIPI-GMAX4002M的支持。
增加mv_probe.sh脚本的使用描述。
去掉使用gstreamer预览UYVY格式的描述。
- 2024-07-08
增加对RAW-MIPI-SC535M的支持。
- 2024-01-01
增加对树莓派5的相关说明。
- 2023-08-16
增加对RAW-MIPI-IMX462M和RAW-MIPI-AR0234M的支持。
- 2023-06-07
增加使用qv4l2和VLC预览画面的方法。
- 2023-04-14
配合新版本驱动,去掉了翻转操作,增加了一种roi配置方法。
- 2023-03-29
增加opencv sample。
- 2023-03-26
增加MV-MIPI-IMX287M的支持。
- 2023-03-04
增加Bullseye系统中CM4的相关说明。
- 2023-02-10
V4L2模式下增加了CM4的说明。
- 2022-12-08
增加了MV-MIPI-IMX264M的支持。
- 2022-11-02
增加了IMX265和SC132新型号的支持。
- 2022-05-16
提供了图片格式转换工具。
- 2022-04-14
第一个版本
