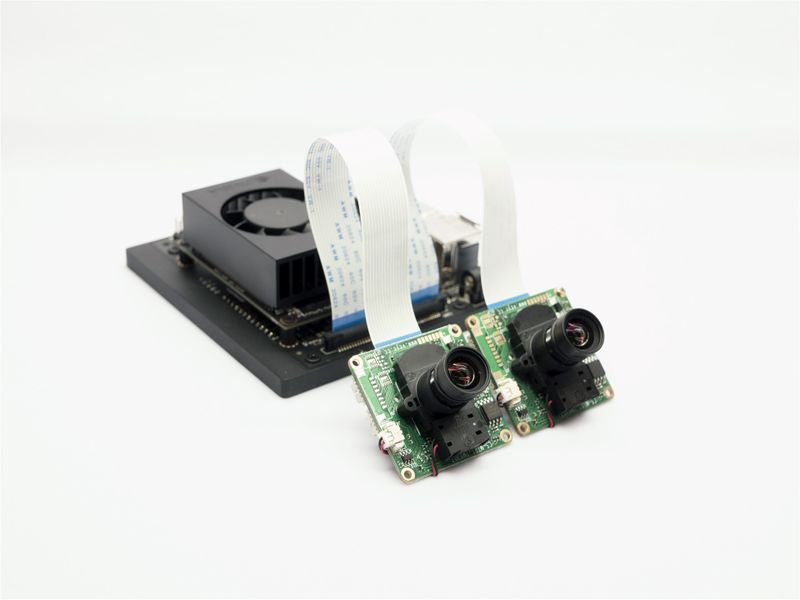
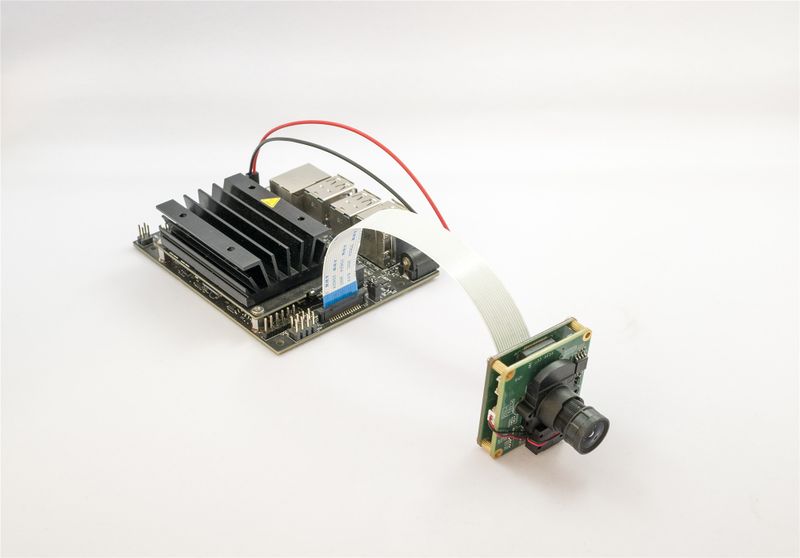
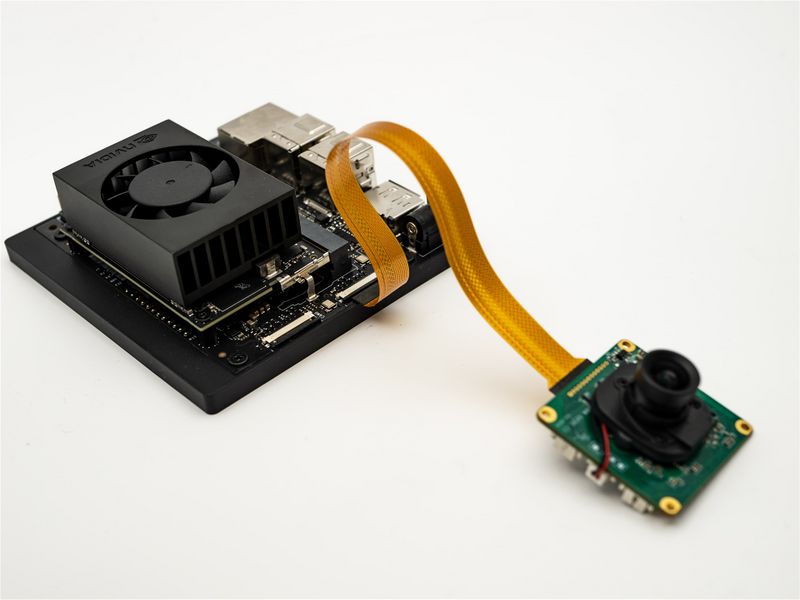
Difference between revisions of "VEYE CS Camera for Jetson TX2/zh"
(→升级dtb) |
|||
| (171 intermediate revisions by 3 users not shown) | |||
| Line 1: | Line 1: | ||
[[VEYE CS Camera for Jetson TX2|English]] | [[VEYE CS Camera for Jetson TX2|English]] | ||
| − | '''<big>如何在英伟达Jetsno TX2, | + | '''<big>如何在英伟达Jetsno Nano,TX2,Xavier和Orin平台使用VEYE系列和CS系列摄像头模组</big>''' |
===概述=== | ===概述=== | ||
| − | 本文讲述怎样将VEYE系列和CS系列模组接入到英伟达公司的Jetson | + | 本文讲述怎样将VEYE系列和CS系列模组接入到英伟达公司的Jetson 板子上。采用的软件版本为: |
*Jetpack4.2.2,L4T版本r32.2.1 | *Jetpack4.2.2,L4T版本r32.2.1 | ||
*Jetpack4.3,L4T版本r32.3.1 | *Jetpack4.3,L4T版本r32.3.1 | ||
*Jetpack4.4,L4T版本r32.4.3 | *Jetpack4.4,L4T版本r32.4.3 | ||
| + | *Jetpack4.4.1,L4T版本r32.4.4 | ||
| + | *Jetpack4.5,L4T版本r32.5 | ||
| + | *Jetpack4.5.1,L4T版本r32.5.1 | ||
| + | *Jetpack4.6,L4T版本r32.6.1 | ||
| + | *Jetpack4.6.1,L4T版本r32.7.1 | ||
| + | *Jetpack4.6.3,L4T版本r32.7.3 | ||
| + | *Jetpack4.6.2,L4T版本r32.7.2 | ||
| + | *Jetpack4.6.4,L4T版本r32.7.4 | ||
| + | *Jetpack5.0.1DP,L4T版本r34.1.1 | ||
| + | *Jetpack5.0.2,L4T版本r35.1 | ||
| + | *Jetpack5.1,L4T版本r35.2.1 | ||
| + | *Jetpack5.1.1,L4T版本r35.3.1 | ||
| + | *Jetpack5.1.2,L4T版本r35.4.1 | ||
| + | *Jetpack5.1.3,L4T版本r35.5 | ||
| + | *Jetpack5.1.4,L4T版本r35.6 | ||
| + | *Jetpack6.0,L4T版本r36.3 | ||
| + | *Jetpack6.1,L4T版本r36.4 | ||
| + | *Jetpack6.2,L4T版本r36.4.3 | ||
| + | *Jetpack6.2.1,L4T版本r36.4.4 | ||
我们提供了编译好的固件和源代码两种方式来方便用户的使用。 | 我们提供了编译好的固件和源代码两种方式来方便用户的使用。 | ||
| − | VEYE-MIPI- | + | VEYE系列和CS系列摄像头是内置ISP的摄像头模组,输出为MIPI-CSI2接口UYVY流模式。对于图像效果参数,我们并没有采用V4L2接口实现,而是采用了DRA(Directly Register Access)模式,我们提供了一组Shell脚本直接控制摄像头模组。 |
| + | ====支持的模组:==== | ||
| + | {| class="wikitable" | ||
| + | |+模组型号支持表 | ||
| + | !系列 | ||
| + | !型号 | ||
| + | !状态 | ||
| + | |- | ||
| + | |VEYE系列 | ||
| + | |VEYE-MIPI-IMX327S | ||
| + | |完成 | ||
| + | |- | ||
| + | |VEYE系列 | ||
| + | |VEYE-MIPI-IMX385 | ||
| + | |完成 | ||
| + | |- | ||
| + | |VEYE系列 | ||
| + | |VEYE-MIPI-IMX462 | ||
| + | |完成 | ||
| + | |- | ||
| + | |VEYE系列 | ||
| + | |VEYE-MIPI-IMX335 | ||
| + | |完成 | ||
| + | |- | ||
| + | |CS系列 | ||
| + | |CS-MIPI-IMX307 | ||
| + | |完成 | ||
| + | |- | ||
| + | |CS系列 | ||
| + | |CS-MIPI-SC132 | ||
| + | |完成 | ||
| + | |- | ||
| + | |套装系列 | ||
| + | |CS-TX2-XAVIER-'''''n'''''CAM | ||
| + | |完成 | ||
| + | |}VEYE系列和CS系列MIPI摄像头模组是内置ISP的,输出为MIPI-CSI2接口。 | ||
| + | ====怎样查看当前L4T版本==== | ||
| − | === | + | ===== 方法1 ===== |
| − | + | 在jetson板子上,查看当前L4T版本,尽量使用同一版本进行替换。 | |
| − | [ | + | |
| + | <code>cat /etc/nv_tegra_release</code> | ||
| + | |||
| + | 如显示: | ||
| + | |||
| + | <code># R32 (release), REVISION: 4.3......</code> | ||
| + | |||
| + | 则表示当前L4T版本为32.4.3。 | ||
| + | |||
| + | ===== 方法2 ===== | ||
| + | 参考这个[https://pypi.org/project/jetson-stats/ 链接],安装jetson-stats: | ||
| + | <code>jtop</code> | ||
| + | ===硬件准备及安装=== | ||
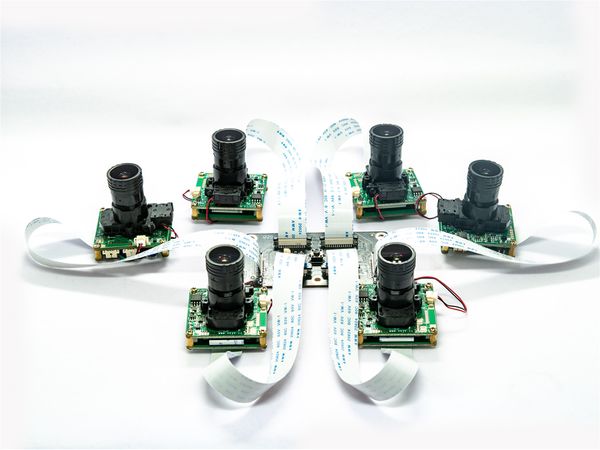
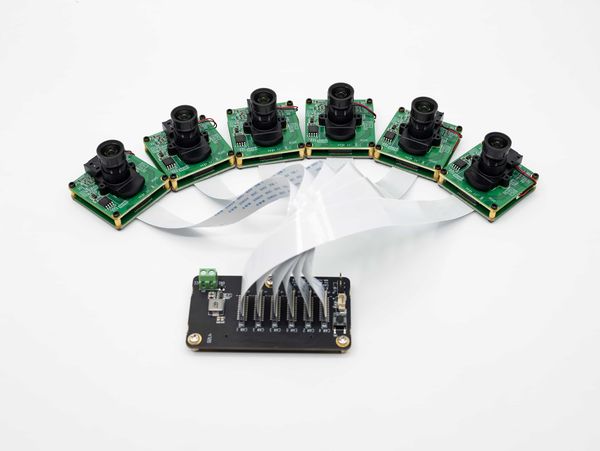
| + | 我们设计了专用的转接板,支持6路摄像头,兼容TX2 Devkit,Xavier和Orin。 | ||
| + | {| class="wikitable" | ||
| + | !ADP-N1连接图 | ||
| + | !ADP-N1 V2.0连接图 | ||
| + | |- | ||
| + | |[[File:ADP-N1-6CAM YT0.95-4I.jpg|center|thumb|600x600px|6cam interposer board connected with 6 cameras|alt=]] | ||
| + | |[[File:ADP-N1-V2.0 6CAM-VEYE-MIPI-327.jpg|alt=|center|thumb|600x600px|6cam interposer board connected with 6 cameras]] | ||
| + | |} | ||
| + | '''<big><big>特别的,VEYE-MIPI-IMX335由于功耗较高,必须使用12V DC端子提供辅助供电。参考[[ADP-N1-V2.0 Adapter Board Data Sheet#Adapter Board Pinlist.EF.BC.88.E6.8E.A5.E5.8F.A3.E5.92.8C.E5.BC.95.E8.84.9A.E8.AF.B4.E6.98.8E.EF.BC.89|ADP-N1的J11]]。</big></big>''' | ||
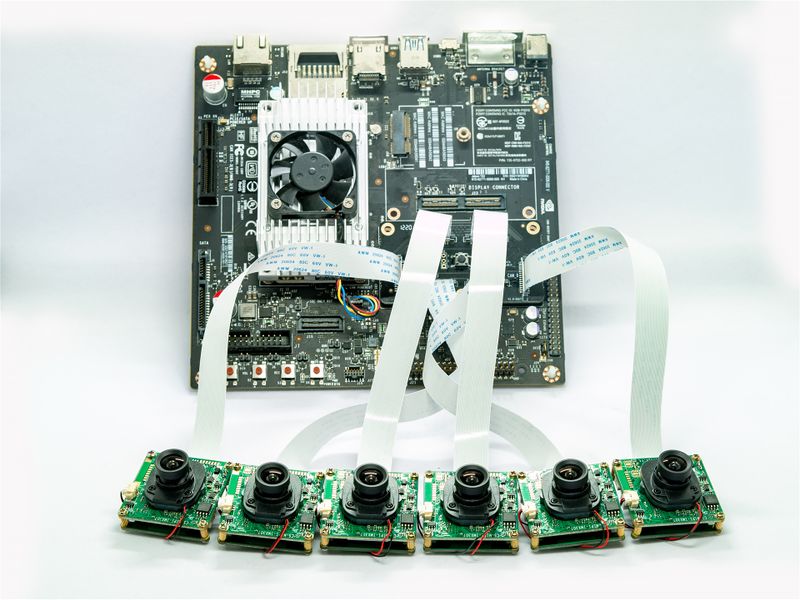
====英伟达TX2 Developer Kit==== | ====英伟达TX2 Developer Kit==== | ||
[[File:TX2 Devkit 6cam.jpg|center|thumb|800x800px|'''TX2 Devkit 6 cameras connection''']] | [[File:TX2 Devkit 6cam.jpg|center|thumb|800x800px|'''TX2 Devkit 6 cameras connection''']] | ||
| − | <br /> | + | <br />'''注意,使用中请务必用螺丝将ADP转接板固定到底板上面,以保证转接板安装平正。''' |
| − | ====英伟达AGX Xavier==== | + | ====英伟达AGX Xavier(AGX Orin与此相同)==== |
转接板是兼容TX2转接板的,连接方式如图: | 转接板是兼容TX2转接板的,连接方式如图: | ||
| − | [[File: | + | [[File:ADP-N1-V2.0 XAVIER 6CAM.jpg|alt=Connect VEYE cameras to AGX Xavier|center|thumb|800x800px|Connect VEYE cameras to AGX Xavier]] |
| − | + | <br />'''注意,使用中请务必用螺丝将ADP转接板固定到底板上面,以保证转接板安装平正。''' | |
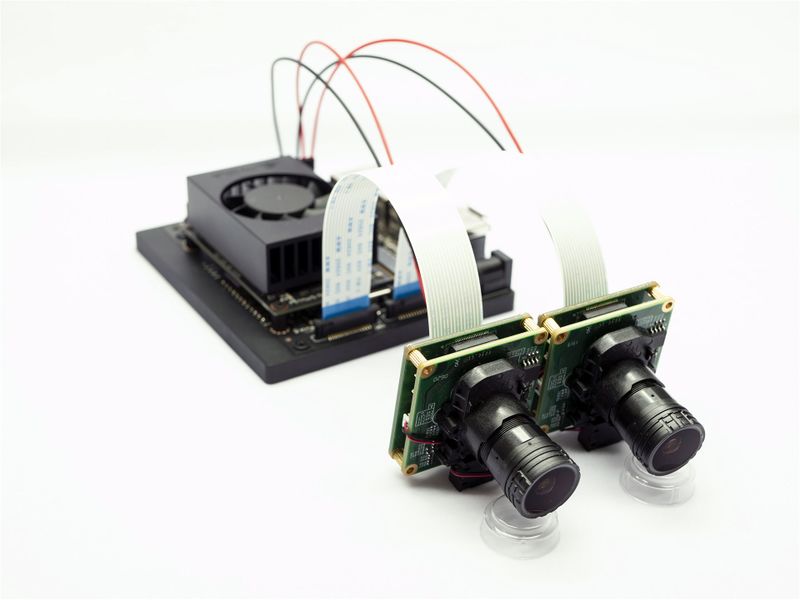
| − | ==== | + | ====英伟达Nano 、 Xavier NX Devkit和TX2 NX==== |
Xavier NX 的接口是兼容树莓派和Jetson Nano的。 连接方式如图: | Xavier NX 的接口是兼容树莓派和Jetson Nano的。 连接方式如图: | ||
[[File:Xavier NX connection with VEYE-MIPI-327.jpg|alt=Xavier NX connection with VEYE-MIPI-327|center|thumb|800x800px|'''Xavier NX connection with VEYE-MIPI-327''']] | [[File:Xavier NX connection with VEYE-MIPI-327.jpg|alt=Xavier NX connection with VEYE-MIPI-327|center|thumb|800x800px|'''Xavier NX connection with VEYE-MIPI-327''']] | ||
[[File:Xavier NX connection with CS-MIPI-IMX307.jpg|alt=Xavier NX connection with CS-MIPI-IMX307|center|thumb|800x800px|Xavier NX connection with CS-MIPI-IMX307(3.3V供电)]] | [[File:Xavier NX connection with CS-MIPI-IMX307.jpg|alt=Xavier NX connection with CS-MIPI-IMX307|center|thumb|800x800px|Xavier NX connection with CS-MIPI-IMX307(3.3V供电)]] | ||
[[File:Jetson nano to Veye327.jpg|alt=Jetson Nano A02 与VEYE模组连接|center|thumb|800x800px|Jetson Nano A02 与VEYE模组连接]] | [[File:Jetson nano to Veye327.jpg|alt=Jetson Nano A02 与VEYE模组连接|center|thumb|800x800px|Jetson Nano A02 与VEYE模组连接]] | ||
| + | [[File:VEYE camera connection with Orin Nano and Orin NX.jpg|center|thumb|800x800px|VEYE camera connection with Orin Nano and Orin NX]] | ||
<br /> | <br /> | ||
| − | === | + | ===更新Jetson系统=== |
| + | 本章节描述怎样更新Jetson的L4T系统以支持我们的摄像头模组。操作系统更新方法,请参考[[How to upgrade the Jetson system to support VEYE cameras/zh|更新Jetson操作系统]]。 | ||
| + | ===应用和测试=== | ||
| + | ====系统状态检测==== | ||
| + | 完成系统安装后,在Jetson板端执行以下命令来检测是否正确连接摄像头。 | ||
| − | + | *VEYE-MIPI-X型号(使用VEYE-MIPI-CAM2M dtb) | |
| − | |||
| − | + | <code>dmesg | grep veye</code> | |
| − | + | 应当有类似如下提示: | |
| − | + | <code>camera id is veyecam</code> | |
| − | |||
| − | + | <code>sensor is IMX327/IMX462/IMX385</code> | |
| − | + | <code>subdev veyecam [i2c_bus]-003b bound</code> | |
| − | + | 此外,检查/dev/videoX设备节点,应当是存在的。 | |
| − | + | *CS-MIPI-IMX307型号 | |
| − | + | <code>dmesg | grep x307</code> | |
| − | + | 应当有类似如下提示: | |
| − | + | <code>Detected CS307 sensor</code> | |
| − | + | <code>subdev csx307 [i2c_bus]-003b bound</code> | |
| − | + | 此外,检查/dev/videoX设备节点,应当是存在的。 | |
| − | + | *CS-MIPI-SC132型号 | |
| − | |||
| − | + | <code>dmesg | grep cssc132</code> | |
| − | + | 应当有类似如下提示: | |
| − | |||
| − | |||
| − | |||
| − | |||
| − | + | <code>subdev cssc132 [i2c_bus]-003b bound</code> | |
| − | + | 此外,检查/dev/videoX设备节点,应当是存在的。 | |
| − | |||
| − | + | * VEYE-MIP-IMX335型号 | |
| − | + | <code>dmesg | grep imx335</code> | |
| − | + | 应当有类似如下提示: | |
| − | + | <code>camera id is VEYE-MIPI-IMX335</code> | |
| − | + | <code>subdev veye_imx335 [i2c_bus]-003b bound</code> | |
| − | |||
| − | + | 此外,检查/dev/videoX设备节点,应当是存在的。 | |
| − | + | *VEYE-MIPI-327型号(使用VEYE-MIPI-327 dtb) | |
| − | |||
| − | <code> | + | <code>dmesg | grep veye327</code> |
| − | + | 应当有类似如下提示: | |
| − | |||
| − | <code> | + | <code>Detected VEYE327 sensor</code> |
| − | + | <code>subdev veye327 [i2c_bus]-003b bound</code> | |
| − | + | 此外,检查/dev/videoX设备节点,应当是存在的。 | |
| − | ==== | + | 驱动提示信息中的<code>[i2c_bus]</code>表示此摄像头对应的i2c总线。 |
| + | ====视频流软件包和测试==== | ||
| + | 摄像头模组在Jetson系统中映射为/dev/videoX设备节点。 | ||
| − | + | 操作系统启动过程中,按照i2c bus从小到大的顺序探测摄像头。X值是按照探测的逻辑顺序[0-5]递增的。 | |
| − | + | 举例说,如果只接入一个摄像头,无论硬件连接到哪个位置,X都为0。如果接入5个,则按照i2c bus从小到大,X为[0-4]。 | |
| − | + | gstreamer中,v4l2src和nvv4l2camerasrc可以通过指明device=/dev/videoX来访问不同的摄像头。 | |
| − | + | =====Gstreamer Usage===== | |
| + | To install the latest accelerated gstreamer plugins and applications, run the following commands: | ||
| − | + | <code>sudo apt-get update</code> | |
| − | + | <code>sudo apt-get install nvidia-l4t-gstreamer</code> | |
| − | + | <code>sudo ldconfig</code> | |
| − | <code>./ | + | <code>rm -rf .cache/gstreamer-1.0/</code> |
| − | + | <code>export DISPLAY=:0</code> | |
| − | + | *视频预览1080p HD | |
| − | + | <code>gst-launch-1.0 nvv4l2camerasrc device=/dev/video0 ! "video/x-raw(memory:NVMM),format=(string)UYVY, width=(int)1920, height=(int)1080" ! nvvidconv ! "video/x-raw(memory:NVMM),format=(string)I420" ! nv3dsink sync=false</code> | |
| − | <code>./ | + | <code>gst-launch-1.0 nvv4l2camerasrc device=/dev/video0 ! "video/x-raw(memory:NVMM),format=(string)UYVY, width=(int)1920, height=(int)1080" ! nvvidconv ! "video/x-raw(memory:NVMM),format=(string)NV12" ! nv3dsink sync=false</code> |
| − | * | + | * 视频预览1080p HD(using xvimagesink sink if supported) |
| − | + | <code>export DISPLAY=:0</code> | |
| − | + | <code>gst-launch-1.0 -e v4l2src io-mode=4 device=/dev/video0 do-timestamp=true ! 'video/x-raw, width=1920, height=1080, framerate=30/1, format=UYVY' ! xvimagesink sync=false</code> | |
| − | + | *视频预览720p@60 HD(模组支持此分辨率时) | |
| − | + | <code>gst-launch-1.0 nvv4l2camerasrc ! "video/x-raw(memory:NVMM),format=(string)UYVY, width=(int)1280, height=(int)720, framerate=(fraction)60/1" ! nvvidconv ! "video/x-raw(memory:NVMM),format=(string)I420" ! nv3dsink sync=false</code> | |
| − | + | *视频预览1280*1080@45fpsHD | |
| − | + | <code>gst-launch-1.0 nvv4l2camerasrc ! "video/x-raw(memory:NVMM),format=(string)UYVY, width=(int)1280, height=(int)1080, framerate=(fraction)45/1" ! nvvidconv ! "video/x-raw(memory:NVMM),format=(string)I420" ! nv3dsink sync=false</code> | |
| − | + | *视频预览640*480@130fps(模组支持此分辨率时) | |
| − | + | <code>gst-launch-1.0 nvv4l2camerasrc ! "video/x-raw(memory:NVMM),format=(string)UYVY, width=(int)640, height=(int)480, framerate=(fraction)130/1" ! nvvidconv ! "video/x-raw(memory:NVMM),format=(string)I420" ! nv3dsink sync=false</code> | |
| − | + | *并列预览两路视频 1080p HD | |
| − | + | <code>WIDTH=960</code> | |
| − | <code> | + | <code>HEIGHT=540</code> |
| − | + | <code>CAPS="video/x-raw(memory:NVMM),format=(string)UYVY, width=1920, height=1080"</code> | |
| − | <code> | + | <code>gst-launch-1.0 nvcompositor name=comp sink_0::xpos=0 sink_0::ypos=0 sink_0::width=$WIDTH sink_0::height=$HEIGHT sink_1::xpos=$WIDTH sink_1::ypos=0 sink_1::width=$WIDTH sink_1::height=$HEIGHT ! nv3dsink nvv4l2camerasrc device=/dev/video0 ! $CAPS ! nvvidconv ! "video/x-raw(memory:NVMM),format=(string)I420"! comp. nvv4l2camerasrc device=/dev/video1 ! $CAPS ! nvvidconv ! "video/x-raw(memory:NVMM),format=(string)I420"! comp.</code> |
| − | + | * Gstreamer 嵌入到 OpenCV | |
| − | + | I think maybe OpenCV do not support I420 data format input,so you should convert it to BGR format. | |
| − | - | + | <code>gst-launch-1.0 nvv4l2camerasrc ! video/x-raw(memory:NVMM), format=(string)UYVY, width=(int)1920, height=(int)1080 ! nvvidconv ! video/x-raw(memory:NVMM), format=(string)I420 ! nvvidconv ! video/x-raw, format=(string)BGRx ! videoconvert ! video/x-raw, format=(string)BGR ! appsink</code> |
| − | + | *视频录像1080p HD | |
| − | <code> | + | <code>gst-launch-1.0 nvv4l2camerasrc num-buffers=300 ! "video/x-raw(memory:NVMM),format=(string)UYVY, width=(int)1920, height=(int)1080" ! nvvidconv ! "video/x-raw(memory:NVMM),format=(string)NV12" ! nvv4l2h264enc control-rate=1 bitrate=10000000 ! h264parse ! qtmux ! filesink location=filename.mp4 -e</code> |
| − | + | *录像回放 | |
| − | <code> | + | <code>gst-launch-1.0 filesrc location=filename.mp4 ! qtdemux ! queue ! h264parse ! nvv4l2decoder ! nv3dsink -e</code> |
| − | + | *抓拍图片 | |
| − | <code> | + | <code>gst-launch-1.0 v4l2src num-buffers=1 ! "video/x-raw,format=(string)UYVY, width=(int)1920, height=(int)1080" ! nvvidconv ! "video/x-raw(memory:NVMM),format=(string)I420" ! nvjpegenc ! filesink location=jpgname.jpg</code> |
| − | + | ===== VEYE-MIPI-IMX335 的gstreamer例子 ===== | |
| + | 由于VEYE-MIPI-IMX335仅支持几种特定的分辨率模式,其驱动我们采用了use_sensor_mode_id模式。 | ||
| + | {| class="wikitable" | ||
| + | |+VEYE-MIPI-IMX335 mode | ||
| + | !./veye5_mipi_i2c.sh video mode | ||
| + | !v4l2-ctl sensor_mode | ||
| + | !video format | ||
| + | |- | ||
| + | |1 | ||
| + | |0 | ||
| + | |2592x1944@20fps | ||
| + | |- | ||
| + | |2 | ||
| + | |1 | ||
| + | |2592x1944@12.5fps | ||
| + | |- | ||
| + | |3 | ||
| + | |2 | ||
| + | |2560x1440@25fps | ||
| + | |- | ||
| + | |4 | ||
| + | |3 | ||
| + | |2560x1440@30fps | ||
| + | |} | ||
| − | + | * 准备工作 | |
| − | <code> | + | <code>sudo apt-get install v4l-utils</code> |
| − | + | 参考下面一节,下载好veye5_mipi_i2c.sh工具。 | |
| − | + | * 2592x1944@20fps模式预览,帧率统计 | |
| − | <code> | + | <code>v4l2-ctl -d /dev/video0 --set-ctrl sensor_mode=0</code> |
| − | + | <code>./veye5_mipi_i2c.sh -w -f videomode -p1 1 -b [busnum]</code> | |
| − | <code> | + | <code>v4l2-ctl -d /dev/video0 --set-ctrl preferred_stride=5376</code> |
| − | + | 预览 | |
| − | + | <code>gst-launch-1.0 nvv4l2camerasrc device=/dev/video0 ! "video/x-raw(memory:NVMM), width=(int)2592, height=(int)1944" ! nvvidconv ! "video/x-raw(memory:NVMM),format=(string)I420" ! nv3dsink sync=false</code> | |
| − | + | 帧率统计 | |
| − | <code> | + | <code>gst-launch-1.0 nvv4l2camerasrc device=/dev/video0 ! "video/x-raw(memory:NVMM),format=(string)UYVY,width=(int)2592,height=(int)1944" ! nvvidconv ! "video/x-raw(memory:NVMM),format=(string)I420" ! fpsdisplaysink video-sink=fakesink -v</code> |
| − | + | * 2560x1440@30fps模式录像、抓拍 | |
| − | <code> | + | <code>v4l2-ctl -d /dev/video0 --set-ctrl sensor_mode=3</code> |
| − | + | <code>./veye5_mipi_i2c.sh -w -f videomode -p1 4 -b [busnum]</code> | |
| − | <code> | + | <code>v4l2-ctl -d /dev/video0 --set-ctrl preferred_stride=5120</code> |
| − | |||
| − | |||
| − | + | 录像 | |
| − | <code> | + | <code>gst-launch-1.0 nvv4l2camerasrc num-buffers=300 ! "video/x-raw(memory:NVMM),format=(string)UYVY, width=(int)2560, height=(int)1440" ! nvvidconv ! "video/x-raw(memory:NVMM),format=(string)NV12" ! nvv4l2h264enc control-rate=0 bitrate=10000000 ! h264parse ! qtmux ! filesink location=filename.mp4 -e</code> |
| − | + | 录像回放 | |
| − | |||
| − | + | <code>gst-launch-1.0 filesrc location=filename.mp4 ! qtdemux ! queue ! h264parse ! nvv4l2decoder ! nvoverlaysink -e</code> | |
| − | + | 抓图 | |
| − | + | <code>gst-launch-1.0 v4l2src num-buffers=1 ! "video/x-raw,format=(string)UYVY, width=(int)2560, height=(int)1440" ! nvvidconv ! "video/x-raw(memory:NVMM),format=(string)I420" ! nvjpegenc ! filesink location=jpgname.jpg</code> | |
| − | + | ===== Jetson multimedia-api samples ===== | |
| + | Jetson平台上提供了[https://docs.nvidia.com/jetson/l4t-multimedia/index.html Jetson Linux API] 供开发者使用。具体jetson_multimedia_api包的安装请参考nVidia官方文档。 | ||
| − | + | 对于VEYE和CS系列相机,已经在相机内集成了ISP功能,因此不能使用libargus获取数据,而可以直接使用使用标准V4L2接口从/dev/videoX设备文件获取数据。 | |
| − | + | 下面两个sample可以直接运行: | |
| − | + | ====== 12_camera_v4l2_cuda ====== | |
| + | <code>./camera_v4l2_cuda -d /dev/video0 -s 1920x1080 -f UYVY</code> | ||
| − | + | ====== v4l2cuda ====== | |
| + | <code>./capture-cuda -d /dev/video0 -f UYVY -m -o out.ppm -s 1920x1080 -c 1</code> | ||
| − | + | ===== v4l2-ctl 应用范例 ===== | |
| − | <code>sudo | + | ======安装v4l2-utils====== |
| + | <code>sudo apt-get install v4l-utils</code> | ||
| + | ======使用v4l2-ctl配置参数 ====== | ||
| − | + | * 列出相机支持的数据格式 | |
| − | <code> | + | <code>v4l2-ctl --list-formats-ext</code> |
| − | + | * 帧率统计 | |
| − | + | <code>v4l2-ctl --set-fmt-video=width=1920,height=1080,pixelformat=UYVY --stream-mmap --stream-count=-1 --stream-to=/dev/null</code> | |
| − | + | * 保存图片到文件 | |
| − | <code> | + | <code>v4l2-ctl --set-fmt-video=width=1920,height=1080,pixelformat=UYVY --stream-mmap --stream-count=1 --stream-to=uyvy-1920x1080.yuv</code> |
| − | + | ===== yavta ===== | |
| − | + | ======安装yavta====== | |
| + | <code>git clone <nowiki>https://github.com/veyeimaging/yavta.git</nowiki></code> | ||
| − | <code> | + | <code>cd yavta;make</code> |
| − | + | 国内用户可访问[https://gitee.com/veyeimaging/yavta gitee仓库]。 | |
| − | + | ====== 保存图片到文件 ====== | |
| + | <code>./yavta -c1 -FUYVY-1920x1080.yuv --skip 0 -f UYVY -s 1920x1080 /dev/video0</code> | ||
| + | =====Opencv===== | ||
| + | 为了将摄像头数据从v4l2设备导入到opencv,我们提供了几个sample。 | ||
| − | + | We provide some samples [https://github.com/veyeimaging/nvidia_jetson_veye_bsp/tree/master/samples/opencv here]. | |
| + | ====使用i2c脚本修改摄像机参数==== | ||
| − | + | *VEYE-MIPI-CAM2M系列(VEYE-MIPI-327、VEYE-MIPI-IMX327S、VEYE-MIPI-IMX462、VEYE-MIPI-IMX385) | |
| − | + | 具体使用说明请见:[[VEYE-MIPI-290/327/zh/i2c|VEYE-MIPI-327 I2C脚本使用说明]]。 | |
| − | + | *CS-MIPI-IMX307和CS-MIPI-SC132 | |
| − | + | 具体使用说明请见:[[CS-MIPI-X i2c/zh|CS-MIPI-X I2C脚本使用说明]]。 | |
| − | |||
| − | |||
| − | |||
| − | |||
| − | |||
| − | |||
| − | |||
| − | |||
| − | |||
| − | |||
| − | |||
| − | |||
| − | |||
| − | |||
| − | |||
| − | |||
| − | |||
| − | |||
| − | |||
| − | |||
| − | |||
| − | |||
| − | |||
| − | |||
| − | |||
| − | |||
| − | |||
| − | |||
| − | |||
| − | |||
| − | |||
| − | |||
| − | |||
| − | |||
| − | |||
| − | |||
| − | |||
| − | |||
| − | |||
| − | |||
| − | |||
| − | |||
| − | |||
| − | |||
| − | |||
| − | |||
| − | |||
| − | |||
| − | |||
| − | |||
| − | |||
| − | |||
| − | |||
| − | |||
| − | |||
| − | |||
| − | |||
| − | |||
| − | |||
| − | |||
| − | |||
| − | |||
| − | |||
| − | |||
| − | |||
| − | |||
| − | |||
| − | |||
| − | |||
| − | |||
| − | |||
| − | |||
| − | |||
| − | |||
| − | |||
| − | |||
| − | |||
| − | |||
| − | |||
| − | |||
| − | |||
| − | |||
| − | |||
| − | |||
| − | |||
| − | |||
| − | |||
| − | |||
| − | |||
| − | |||
| − | |||
| − | |||
| − | |||
| − | |||
| − | |||
| − | |||
| − | |||
| − | |||
| − | |||
| − | |||
| − | |||
| − | |||
| − | |||
| − | |||
| − | |||
| − | |||
| − | |||
| − | |||
| − | |||
| − | |||
| − | |||
| − | |||
| − | |||
| − | |||
| − | |||
| − | |||
| − | |||
| − | |||
| − | |||
| − | |||
| − | |||
| − | |||
| − | |||
| − | |||
| − | |||
| − | |||
| − | |||
| − | |||
| − | |||
| − | |||
| − | |||
| − | |||
| − | |||
| − | |||
| − | |||
| − | |||
| − | |||
| − | |||
| − | |||
| − | |||
| − | |||
| − | |||
| − | |||
| − | |||
| − | |||
| − | |||
| − | |||
| − | |||
| − | |||
| − | |||
| − | |||
| − | |||
| − | |||
| − | |||
| − | |||
| − | |||
| − | |||
| − | |||
| − | |||
| − | |||
| − | |||
| − | |||
| − | |||
| − | |||
| − | |||
| − | |||
| − | |||
| − | |||
| − | |||
| − | |||
| − | |||
| − | |||
| − | |||
| − | |||
| − | |||
| − | |||
| − | |||
| − | |||
| − | |||
| − | |||
| − | |||
| − | |||
| − | |||
| − | |||
| − | |||
| − | |||
| − | |||
| − | |||
| − | |||
| − | |||
| − | |||
| − | |||
| − | |||
| − | |||
| − | |||
| − | |||
| − | |||
| − | |||
| − | |||
| − | |||
| − | |||
| − | |||
| − | |||
| − | |||
| − | |||
| − | |||
| − | |||
| − | |||
| − | |||
| − | |||
| − | |||
| − | |||
| − | |||
| − | |||
| − | |||
| − | |||
| − | |||
| − | |||
| − | |||
| − | |||
| − | |||
| − | |||
| − | |||
| − | |||
| − | |||
| − | |||
| − | |||
| − | * | + | * VEYE-MIPI-IMX335 |
| − | + | 具体使用说明请见:[[5m mipi i2c user guide/zh|VEYE-MIPI-IMX335 I2C脚本使用说明]]。 | |
| + | ===怎样移植驱动到第三方底板=== | ||
| + | 源码编译步骤请参考:[[VEYE CS Camera source for Jetson/zh|英伟达Jetson平台上VEYE和CS系列摄像头驱动源码编译指南]] | ||
| − | + | ==== 驱动移植 ==== | |
| + | 对于Image,我们是在官方标准Image基础上增加了功能,并没有做任何删减。一般情况下,可以直接使用我们编译好的Image。特殊情况请参考源码进行整合。 | ||
| − | + | 对于modules则更简单,直接使用即可。从源码编译和非常简单,此处不做赘述。 | |
| − | + | ==== dts移植 ==== | |
| − | ==== | + | 我们只提供了Nano、TX2、Xavier、Orin的部分板子的dtb,对于没有提供的类型,需要: |
| − | |||
| − | + | 1. 得到该板子的dts源码。 | |
| − | + | 2. 我们camera相关的dts到整体中。 | |
| − | + | 3. 重新编译得到对应板子的dtb。 | |
| − | + | 操作步骤并不复杂,但是有一些第三方底板厂家并不开放dts源码。这就需要各方的配合才能做到了。 | |
| − | + | === 常见问题和bug列表 === | |
| − | + | ==== VEYE cameras on Jetpack5.x ==== | |
| + | Jetpack5.x在xavier和orin平台对mipi信号的要求更加严格。VEYE-MIPI-xxx系列相机需要固件版本hdver>=7才可以完美支持。 | ||
| − | + | ==== CS-MIPI-IMX307配合Orin nano以及Orin NX绿屏 ==== | |
| + | 当CS-MIPI-IMX307使用FFC cable的3.3V供电模式时,现在(Jetpack5.1.1)Orin nano和Orin NX的MIPI接收状态机会进入错误状态。建议参考[[Power supply mode switching/zh|此文章]],修改CS-MIPI-IMX307的供电模式,使用5V供电模式。 | ||
| − | + | ==== Jetpack5.0.1 DP ==== | |
| + | 本版本有很多bug,如不支持nvv4l2camerasrc,不建议使用。 | ||
| − | + | ==== nv3dsink ==== | |
| + | Jetpack5.x不再支持nvoverlaysink,使用nv3dsink替代之。nv3ksink需要使用本地执行,不能ssh远程登陆执行。 | ||
| + | === 文档历史 === | ||
| − | + | * 2024-10-22 | |
| − | + | 将常见问题的一部分转移到驱动升级的文章中。 | |
| − | + | * 2024-08-06 | |
| − | + | 将第三章独立成一篇。 | |
| − | + | * 2024-05-22 | |
| − | + | 支持Jetpack5.1.3。 | |
| − | * | + | *20230427 |
| − | + | 支持Jetpack5.1.1。 | |
| − | * | + | * 20230222 |
| − | + | 支持Jetpack5.1。 | |
| − | * | + | *20220831 |
| − | + | 完善Jetpack5.0.2下关于VEYE系列和 MV系列的说明。 | |
| − | |||
| − | * | + | * 20220824 |
| − | + | 支持Jetpack5.0.2。 | |
| − | + | * 20220720 | |
| − | + | 增加Jetson multimedia-api和v4l2-ctl描述。 | |
| − | + | * 20220714 | |
| − | + | 增加对L4T32.7.2的说明。 | |
| − | + | * 20220629 | |
| − | + | 增加Jetpack5.0.1DP的支持,调通AGX-Orin。 | |
| − | * | + | * 20220110 |
| − | + | 增加对新型号VEYE-MIPI-IMX335的相关说明。 | |
| − | * | + | * 20220105 |
| − | + | Use nvv4l2h264enc instead of omxh264enc in gstreamer command,because omxh264enc has been deprecated. | |
| − | |||
| − | |||
| − | |||
| − | |||
| − | |||
| − | |||
| − | |||
| − | + | * 20211025 | |
| − | + | gstreamer命令中,普遍采用nvv4l2camerasrc代替v4l2src,数据直接进入DMA内存。 | |
| − | |||
| − | |||
| − | |||
| − | |||
| − | |||
| − | |||
| − | |||
===参考资料=== | ===参考资料=== | ||
| Line 608: | Line 476: | ||
SDK Manager: https://docs.nvidia.com/sdk-manager/index.html | SDK Manager: https://docs.nvidia.com/sdk-manager/index.html | ||
| − | L4T Doc: https://docs.nvidia.com/jetson/archives/l4t-archived/l4t- | + | L4T Doc: https://docs.nvidia.com/jetson/archives/l4t-archived/l4t-325/ |
| + | |||
| + | https://docs.nvidia.com/jetson/archives/r35.3.1/DeveloperGuide/index.html | ||
TX2 user guide: [https://developer.download.nvidia.cn/embedded/L4T/r28_Release_v2.0/GA/Docs/Jetson_TX1_and_TX2_Developer_Kits_User_Guide.pdf?lumI95GW6BEyMmhP1Is8E79OYo105-tpsC2bOVQmBZ6Tw8AkLU4pSDMPCuzOaEonWMiDO2hliXbNvtkH9do81TNIXmLZGGoV7xoEehyEgfc2WO8e0Czz5chLSHoCqIuPLL1 link] | TX2 user guide: [https://developer.download.nvidia.cn/embedded/L4T/r28_Release_v2.0/GA/Docs/Jetson_TX1_and_TX2_Developer_Kits_User_Guide.pdf?lumI95GW6BEyMmhP1Is8E79OYo105-tpsC2bOVQmBZ6Tw8AkLU4pSDMPCuzOaEonWMiDO2hliXbNvtkH9do81TNIXmLZGGoV7xoEehyEgfc2WO8e0Czz5chLSHoCqIuPLL1 link] | ||
| − | |||
| − | |||
| − | |||
| − | |||
Latest revision as of 17:40, 6 September 2025
如何在英伟达Jetsno Nano,TX2,Xavier和Orin平台使用VEYE系列和CS系列摄像头模组
1 概述
本文讲述怎样将VEYE系列和CS系列模组接入到英伟达公司的Jetson 板子上。采用的软件版本为:
- Jetpack4.2.2,L4T版本r32.2.1
- Jetpack4.3,L4T版本r32.3.1
- Jetpack4.4,L4T版本r32.4.3
- Jetpack4.4.1,L4T版本r32.4.4
- Jetpack4.5,L4T版本r32.5
- Jetpack4.5.1,L4T版本r32.5.1
- Jetpack4.6,L4T版本r32.6.1
- Jetpack4.6.1,L4T版本r32.7.1
- Jetpack4.6.3,L4T版本r32.7.3
- Jetpack4.6.2,L4T版本r32.7.2
- Jetpack4.6.4,L4T版本r32.7.4
- Jetpack5.0.1DP,L4T版本r34.1.1
- Jetpack5.0.2,L4T版本r35.1
- Jetpack5.1,L4T版本r35.2.1
- Jetpack5.1.1,L4T版本r35.3.1
- Jetpack5.1.2,L4T版本r35.4.1
- Jetpack5.1.3,L4T版本r35.5
- Jetpack5.1.4,L4T版本r35.6
- Jetpack6.0,L4T版本r36.3
- Jetpack6.1,L4T版本r36.4
- Jetpack6.2,L4T版本r36.4.3
- Jetpack6.2.1,L4T版本r36.4.4
我们提供了编译好的固件和源代码两种方式来方便用户的使用。
VEYE系列和CS系列摄像头是内置ISP的摄像头模组,输出为MIPI-CSI2接口UYVY流模式。对于图像效果参数,我们并没有采用V4L2接口实现,而是采用了DRA(Directly Register Access)模式,我们提供了一组Shell脚本直接控制摄像头模组。
1.1 支持的模组:
| 系列 | 型号 | 状态 |
|---|---|---|
| VEYE系列 | VEYE-MIPI-IMX327S | 完成 |
| VEYE系列 | VEYE-MIPI-IMX385 | 完成 |
| VEYE系列 | VEYE-MIPI-IMX462 | 完成 |
| VEYE系列 | VEYE-MIPI-IMX335 | 完成 |
| CS系列 | CS-MIPI-IMX307 | 完成 |
| CS系列 | CS-MIPI-SC132 | 完成 |
| 套装系列 | CS-TX2-XAVIER-nCAM | 完成 |
VEYE系列和CS系列MIPI摄像头模组是内置ISP的,输出为MIPI-CSI2接口。
1.2 怎样查看当前L4T版本
1.2.1 方法1
在jetson板子上,查看当前L4T版本,尽量使用同一版本进行替换。
cat /etc/nv_tegra_release
如显示:
# R32 (release), REVISION: 4.3......
则表示当前L4T版本为32.4.3。
1.2.2 方法2
参考这个链接,安装jetson-stats:
jtop
2 硬件准备及安装
我们设计了专用的转接板,支持6路摄像头,兼容TX2 Devkit,Xavier和Orin。
| ADP-N1连接图 | ADP-N1 V2.0连接图 |
|---|---|
特别的,VEYE-MIPI-IMX335由于功耗较高,必须使用12V DC端子提供辅助供电。参考ADP-N1的J11。
2.1 英伟达TX2 Developer Kit
注意,使用中请务必用螺丝将ADP转接板固定到底板上面,以保证转接板安装平正。
2.2 英伟达AGX Xavier(AGX Orin与此相同)
转接板是兼容TX2转接板的,连接方式如图:
注意,使用中请务必用螺丝将ADP转接板固定到底板上面,以保证转接板安装平正。
2.3 英伟达Nano 、 Xavier NX Devkit和TX2 NX
Xavier NX 的接口是兼容树莓派和Jetson Nano的。 连接方式如图:
3 更新Jetson系统
本章节描述怎样更新Jetson的L4T系统以支持我们的摄像头模组。操作系统更新方法,请参考更新Jetson操作系统。
4 应用和测试
4.1 系统状态检测
完成系统安装后,在Jetson板端执行以下命令来检测是否正确连接摄像头。
- VEYE-MIPI-X型号(使用VEYE-MIPI-CAM2M dtb)
dmesg | grep veye
应当有类似如下提示:
camera id is veyecam
sensor is IMX327/IMX462/IMX385
subdev veyecam [i2c_bus]-003b bound
此外,检查/dev/videoX设备节点,应当是存在的。
- CS-MIPI-IMX307型号
dmesg | grep x307
应当有类似如下提示:
Detected CS307 sensor
subdev csx307 [i2c_bus]-003b bound
此外,检查/dev/videoX设备节点,应当是存在的。
- CS-MIPI-SC132型号
dmesg | grep cssc132
应当有类似如下提示:
subdev cssc132 [i2c_bus]-003b bound
此外,检查/dev/videoX设备节点,应当是存在的。
- VEYE-MIP-IMX335型号
dmesg | grep imx335
应当有类似如下提示:
camera id is VEYE-MIPI-IMX335
subdev veye_imx335 [i2c_bus]-003b bound
此外,检查/dev/videoX设备节点,应当是存在的。
- VEYE-MIPI-327型号(使用VEYE-MIPI-327 dtb)
dmesg | grep veye327
应当有类似如下提示:
Detected VEYE327 sensor
subdev veye327 [i2c_bus]-003b bound
此外,检查/dev/videoX设备节点,应当是存在的。
驱动提示信息中的[i2c_bus]表示此摄像头对应的i2c总线。
4.2 视频流软件包和测试
摄像头模组在Jetson系统中映射为/dev/videoX设备节点。
操作系统启动过程中,按照i2c bus从小到大的顺序探测摄像头。X值是按照探测的逻辑顺序[0-5]递增的。
举例说,如果只接入一个摄像头,无论硬件连接到哪个位置,X都为0。如果接入5个,则按照i2c bus从小到大,X为[0-4]。
gstreamer中,v4l2src和nvv4l2camerasrc可以通过指明device=/dev/videoX来访问不同的摄像头。
4.2.1 Gstreamer Usage
To install the latest accelerated gstreamer plugins and applications, run the following commands:
sudo apt-get update
sudo apt-get install nvidia-l4t-gstreamer
sudo ldconfig
rm -rf .cache/gstreamer-1.0/
export DISPLAY=:0
- 视频预览1080p HD
gst-launch-1.0 nvv4l2camerasrc device=/dev/video0 ! "video/x-raw(memory:NVMM),format=(string)UYVY, width=(int)1920, height=(int)1080" ! nvvidconv ! "video/x-raw(memory:NVMM),format=(string)I420" ! nv3dsink sync=false
gst-launch-1.0 nvv4l2camerasrc device=/dev/video0 ! "video/x-raw(memory:NVMM),format=(string)UYVY, width=(int)1920, height=(int)1080" ! nvvidconv ! "video/x-raw(memory:NVMM),format=(string)NV12" ! nv3dsink sync=false
- 视频预览1080p HD(using xvimagesink sink if supported)
export DISPLAY=:0
gst-launch-1.0 -e v4l2src io-mode=4 device=/dev/video0 do-timestamp=true ! 'video/x-raw, width=1920, height=1080, framerate=30/1, format=UYVY' ! xvimagesink sync=false
- 视频预览720p@60 HD(模组支持此分辨率时)
gst-launch-1.0 nvv4l2camerasrc ! "video/x-raw(memory:NVMM),format=(string)UYVY, width=(int)1280, height=(int)720, framerate=(fraction)60/1" ! nvvidconv ! "video/x-raw(memory:NVMM),format=(string)I420" ! nv3dsink sync=false
- 视频预览1280*1080@45fpsHD
gst-launch-1.0 nvv4l2camerasrc ! "video/x-raw(memory:NVMM),format=(string)UYVY, width=(int)1280, height=(int)1080, framerate=(fraction)45/1" ! nvvidconv ! "video/x-raw(memory:NVMM),format=(string)I420" ! nv3dsink sync=false
- 视频预览640*480@130fps(模组支持此分辨率时)
gst-launch-1.0 nvv4l2camerasrc ! "video/x-raw(memory:NVMM),format=(string)UYVY, width=(int)640, height=(int)480, framerate=(fraction)130/1" ! nvvidconv ! "video/x-raw(memory:NVMM),format=(string)I420" ! nv3dsink sync=false
- 并列预览两路视频 1080p HD
WIDTH=960
HEIGHT=540
CAPS="video/x-raw(memory:NVMM),format=(string)UYVY, width=1920, height=1080"
gst-launch-1.0 nvcompositor name=comp sink_0::xpos=0 sink_0::ypos=0 sink_0::width=$WIDTH sink_0::height=$HEIGHT sink_1::xpos=$WIDTH sink_1::ypos=0 sink_1::width=$WIDTH sink_1::height=$HEIGHT ! nv3dsink nvv4l2camerasrc device=/dev/video0 ! $CAPS ! nvvidconv ! "video/x-raw(memory:NVMM),format=(string)I420"! comp. nvv4l2camerasrc device=/dev/video1 ! $CAPS ! nvvidconv ! "video/x-raw(memory:NVMM),format=(string)I420"! comp.
- Gstreamer 嵌入到 OpenCV
I think maybe OpenCV do not support I420 data format input,so you should convert it to BGR format.
gst-launch-1.0 nvv4l2camerasrc ! video/x-raw(memory:NVMM), format=(string)UYVY, width=(int)1920, height=(int)1080 ! nvvidconv ! video/x-raw(memory:NVMM), format=(string)I420 ! nvvidconv ! video/x-raw, format=(string)BGRx ! videoconvert ! video/x-raw, format=(string)BGR ! appsink
- 视频录像1080p HD
gst-launch-1.0 nvv4l2camerasrc num-buffers=300 ! "video/x-raw(memory:NVMM),format=(string)UYVY, width=(int)1920, height=(int)1080" ! nvvidconv ! "video/x-raw(memory:NVMM),format=(string)NV12" ! nvv4l2h264enc control-rate=1 bitrate=10000000 ! h264parse ! qtmux ! filesink location=filename.mp4 -e
- 录像回放
gst-launch-1.0 filesrc location=filename.mp4 ! qtdemux ! queue ! h264parse ! nvv4l2decoder ! nv3dsink -e
- 抓拍图片
gst-launch-1.0 v4l2src num-buffers=1 ! "video/x-raw,format=(string)UYVY, width=(int)1920, height=(int)1080" ! nvvidconv ! "video/x-raw(memory:NVMM),format=(string)I420" ! nvjpegenc ! filesink location=jpgname.jpg
4.2.2 VEYE-MIPI-IMX335 的gstreamer例子
由于VEYE-MIPI-IMX335仅支持几种特定的分辨率模式,其驱动我们采用了use_sensor_mode_id模式。
| ./veye5_mipi_i2c.sh video mode | v4l2-ctl sensor_mode | video format |
|---|---|---|
| 1 | 0 | 2592x1944@20fps |
| 2 | 1 | 2592x1944@12.5fps |
| 3 | 2 | 2560x1440@25fps |
| 4 | 3 | 2560x1440@30fps |
- 准备工作
sudo apt-get install v4l-utils
参考下面一节,下载好veye5_mipi_i2c.sh工具。
- 2592x1944@20fps模式预览,帧率统计
v4l2-ctl -d /dev/video0 --set-ctrl sensor_mode=0
./veye5_mipi_i2c.sh -w -f videomode -p1 1 -b [busnum]
v4l2-ctl -d /dev/video0 --set-ctrl preferred_stride=5376
预览
gst-launch-1.0 nvv4l2camerasrc device=/dev/video0 ! "video/x-raw(memory:NVMM), width=(int)2592, height=(int)1944" ! nvvidconv ! "video/x-raw(memory:NVMM),format=(string)I420" ! nv3dsink sync=false
帧率统计
gst-launch-1.0 nvv4l2camerasrc device=/dev/video0 ! "video/x-raw(memory:NVMM),format=(string)UYVY,width=(int)2592,height=(int)1944" ! nvvidconv ! "video/x-raw(memory:NVMM),format=(string)I420" ! fpsdisplaysink video-sink=fakesink -v
- 2560x1440@30fps模式录像、抓拍
v4l2-ctl -d /dev/video0 --set-ctrl sensor_mode=3
./veye5_mipi_i2c.sh -w -f videomode -p1 4 -b [busnum]
v4l2-ctl -d /dev/video0 --set-ctrl preferred_stride=5120
录像
gst-launch-1.0 nvv4l2camerasrc num-buffers=300 ! "video/x-raw(memory:NVMM),format=(string)UYVY, width=(int)2560, height=(int)1440" ! nvvidconv ! "video/x-raw(memory:NVMM),format=(string)NV12" ! nvv4l2h264enc control-rate=0 bitrate=10000000 ! h264parse ! qtmux ! filesink location=filename.mp4 -e
录像回放
gst-launch-1.0 filesrc location=filename.mp4 ! qtdemux ! queue ! h264parse ! nvv4l2decoder ! nvoverlaysink -e
抓图
gst-launch-1.0 v4l2src num-buffers=1 ! "video/x-raw,format=(string)UYVY, width=(int)2560, height=(int)1440" ! nvvidconv ! "video/x-raw(memory:NVMM),format=(string)I420" ! nvjpegenc ! filesink location=jpgname.jpg
4.2.3 Jetson multimedia-api samples
Jetson平台上提供了Jetson Linux API 供开发者使用。具体jetson_multimedia_api包的安装请参考nVidia官方文档。
对于VEYE和CS系列相机,已经在相机内集成了ISP功能,因此不能使用libargus获取数据,而可以直接使用使用标准V4L2接口从/dev/videoX设备文件获取数据。
下面两个sample可以直接运行:
4.2.3.1 12_camera_v4l2_cuda
./camera_v4l2_cuda -d /dev/video0 -s 1920x1080 -f UYVY
4.2.3.2 v4l2cuda
./capture-cuda -d /dev/video0 -f UYVY -m -o out.ppm -s 1920x1080 -c 1
4.2.4 v4l2-ctl 应用范例
4.2.4.1 安装v4l2-utils
sudo apt-get install v4l-utils
4.2.4.2 使用v4l2-ctl配置参数
- 列出相机支持的数据格式
v4l2-ctl --list-formats-ext
- 帧率统计
v4l2-ctl --set-fmt-video=width=1920,height=1080,pixelformat=UYVY --stream-mmap --stream-count=-1 --stream-to=/dev/null
- 保存图片到文件
v4l2-ctl --set-fmt-video=width=1920,height=1080,pixelformat=UYVY --stream-mmap --stream-count=1 --stream-to=uyvy-1920x1080.yuv
4.2.5 yavta
4.2.5.1 安装yavta
git clone https://github.com/veyeimaging/yavta.git
cd yavta;make
国内用户可访问gitee仓库。
4.2.5.2 保存图片到文件
./yavta -c1 -FUYVY-1920x1080.yuv --skip 0 -f UYVY -s 1920x1080 /dev/video0
4.2.6 Opencv
为了将摄像头数据从v4l2设备导入到opencv,我们提供了几个sample。
We provide some samples here.
4.3 使用i2c脚本修改摄像机参数
- VEYE-MIPI-CAM2M系列(VEYE-MIPI-327、VEYE-MIPI-IMX327S、VEYE-MIPI-IMX462、VEYE-MIPI-IMX385)
具体使用说明请见:VEYE-MIPI-327 I2C脚本使用说明。
- CS-MIPI-IMX307和CS-MIPI-SC132
具体使用说明请见:CS-MIPI-X I2C脚本使用说明。
- VEYE-MIPI-IMX335
具体使用说明请见:VEYE-MIPI-IMX335 I2C脚本使用说明。
5 怎样移植驱动到第三方底板
源码编译步骤请参考:英伟达Jetson平台上VEYE和CS系列摄像头驱动源码编译指南
5.1 驱动移植
对于Image,我们是在官方标准Image基础上增加了功能,并没有做任何删减。一般情况下,可以直接使用我们编译好的Image。特殊情况请参考源码进行整合。
对于modules则更简单,直接使用即可。从源码编译和非常简单,此处不做赘述。
5.2 dts移植
我们只提供了Nano、TX2、Xavier、Orin的部分板子的dtb,对于没有提供的类型,需要:
1. 得到该板子的dts源码。
2. 我们camera相关的dts到整体中。
3. 重新编译得到对应板子的dtb。
操作步骤并不复杂,但是有一些第三方底板厂家并不开放dts源码。这就需要各方的配合才能做到了。
6 常见问题和bug列表
6.1 VEYE cameras on Jetpack5.x
Jetpack5.x在xavier和orin平台对mipi信号的要求更加严格。VEYE-MIPI-xxx系列相机需要固件版本hdver>=7才可以完美支持。
6.2 CS-MIPI-IMX307配合Orin nano以及Orin NX绿屏
当CS-MIPI-IMX307使用FFC cable的3.3V供电模式时,现在(Jetpack5.1.1)Orin nano和Orin NX的MIPI接收状态机会进入错误状态。建议参考此文章,修改CS-MIPI-IMX307的供电模式,使用5V供电模式。
6.3 Jetpack5.0.1 DP
本版本有很多bug,如不支持nvv4l2camerasrc,不建议使用。
6.4 nv3dsink
Jetpack5.x不再支持nvoverlaysink,使用nv3dsink替代之。nv3ksink需要使用本地执行,不能ssh远程登陆执行。
7 文档历史
- 2024-10-22
将常见问题的一部分转移到驱动升级的文章中。
- 2024-08-06
将第三章独立成一篇。
- 2024-05-22
支持Jetpack5.1.3。
- 20230427
支持Jetpack5.1.1。
- 20230222
支持Jetpack5.1。
- 20220831
完善Jetpack5.0.2下关于VEYE系列和 MV系列的说明。
- 20220824
支持Jetpack5.0.2。
- 20220720
增加Jetson multimedia-api和v4l2-ctl描述。
- 20220714
增加对L4T32.7.2的说明。
- 20220629
增加Jetpack5.0.1DP的支持,调通AGX-Orin。
- 20220110
增加对新型号VEYE-MIPI-IMX335的相关说明。
- 20220105
Use nvv4l2h264enc instead of omxh264enc in gstreamer command,because omxh264enc has been deprecated.
- 20211025
gstreamer命令中,普遍采用nvv4l2camerasrc代替v4l2src,数据直接进入DMA内存。
8 参考资料
Jetson start up: https://developer.nvidia.com/embedded/learn/getting-started-jetson
Jetson Download Center: https://developer.nvidia.com/embedded/downloads
Xavier NX: https://developer.nvidia.com/embedded/learn/get-started-jetson-xavier-nx-devkit
TX2 development kit: https://developer.nvidia.com/embedded/jetson-tx2-developer-kit
SDK Manager: https://docs.nvidia.com/sdk-manager/index.html
L4T Doc: https://docs.nvidia.com/jetson/archives/l4t-archived/l4t-325/
https://docs.nvidia.com/jetson/archives/r35.3.1/DeveloperGuide/index.html
TX2 user guide: link
